Hello everyone, welcome back to .Net Core Central. Today I am going to continue with streaming using ASP.Net Core SignalR, which I started by integrating with Kafka, then Reactive Extensions, and today I will be working with SignalR.
If you have not gone through my previous posts ASP.Net Core Streaming Application Using Kafka – Part 1, ASP.Net Core Streaming Application Using Kafka – Part 2 and Reactive Extensions in .Net Core, I would strongly suggest you do. Though it is not necessary to understand the concepts which I am going to cover here.

What is ASP.Net Core SignalR
Simply put SignalR allows pushing messages from HTTP server into the browser (or any other clients like a WinForm or console applications). So you can push message to browser-based on events on the server, as and when they occur. Which is very powerful when we write SPA (Single Page Application). SignalR uses WebSocket if the web browser supports it, otherwise, it uses other compatible techniques.
Installing SignalR Nuget Package
I am going to add the SignalR NuGet packages to the TimeManagement.Service project. Since the TimeManagement.Service project is already used for Web API. Hence it makes this project the logical host for SIgnalR.
First of all, I will open the TimeManagement solution in Visual Studio 2017. After the solution is opened, I am going to right-click on the TimeManagement.Service project and select “Manage Nuget Packages” option. This will open up the Nuget Package Manager window.
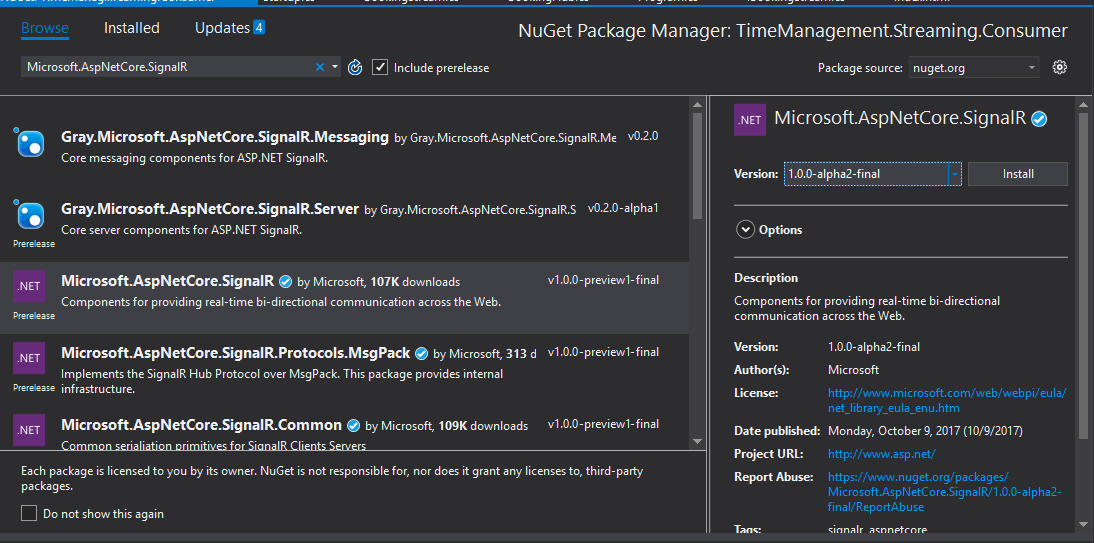
In the Browse tab, I will search for Microsoft.AspNetCore.SignalR. This will show results for all SignalR related NuGet packages.
From the Nuget Package Manager, I will be installing Microsoft.AspNetCore.SignalR package. And I will install the version 1.0.0-alpha2-final.
Creating SignalR Hub
Hub is a base class provided by SignalR which is extended to get all the functionality we need. For the implementation, all we have to do is to create a class and extend it from Hub. A Hub is the high-level pipeline that allows the client and server to call methods on each other directly.
public class BookingHub : Hub { }
Next, I will create a new class BookingMessageRelay, which will be used to send a message to the client using BookingHub.
public class BookingMessageRelay
{
    public BookingMessageRelay(IHubContext hubContext)
    {
        Task.Factory.StartNew(() =>
        {
            while (true)
            {
                hubContext.Clients.All.InvokeAsync("booking", DateTime.Now.Ticks); Thread.Sleep(1000);
            }
        });
    }
}
Wiring SignalR in Startup
The next thing I will do is wire the SignalR infrastructure in the Startup class. First of all, I will update the ConfigureServices method to add the CORS support using AddCors method. And after that, I will add support for SignalR using AddSignalR method. The reason we have to add support for CORS is that the SignalR hub call from the client uses the OPTIONS method. Hence in the CORS option, I will add AllowAllMethods option.
public void ConfigureServices(IServiceCollection services)
{
    services.AddMvc();

    var builder = new ConfigurationBuilder().SetBasePath(Directory.GetCurrentDirectory()).AddJsonFile("appsettings.json");
    var config = builder.Build();

    services.AddTransient<IEmployeeProvider>(p => new EmployeeProvider(config["ConnectionString:TimeManagement"]));
    services.AddTransient<IEmployeeProcessor>(p => new EmployeeProcessor(config["ConnectionString:TimeManagement"]));

    services.AddCors(options =>
    {
        options.AddPolicy("CorsPolicy", b => {
            b.AllowAnyMethod();
        });
    });

    services.AddSignalR();
}
Furthermore, I will update the Configure method inside Startup class to use CORS and SignalR. For using CORS, I will call the UseCors method passing the same name (“CorsPolicy”) I provided when adding the CORS in the ConfigureServices method. And for using SignalR, I will call UseSignalR method, and configure the route for the BookingHub. Finally, I will call GetService to get an instance of BookingRelay. And I need that so that the singleton instance of BookingRelay is created and starts sending messages to all connected clients.
public void Configure(IApplicationBuilder app, IHostingEnvironment env)
{
    if (env.IsDevelopment())
    {
        app.UseDeveloperExceptionPage();
    }
    app.UseCors("CorsPolicy");
    app.UseSignalR(routes => {
        routes.MapHub<BookingHub>("bookingHub");
    });

    app.ApplicationServices.GetService<BookingMessageRelay>();
}
Configuring HTML client
After the server configuration completed I would need a client to test that the implementation is working as expected. Hence I will create an index.html file inside the wwwroot folder inside of the ASP.Net project TimeManagement.Service. And the next thing I will need is the SignalR javascript files.
Getting SignalR JavaScript files
I will download SignalR JavaScript from NPM (Node Package Manager). And for that first, I will install Node from the node download link. After the installation is completed I will navigate to the installed path in the command prompt. And use the command “npm install @aspnet/signalr-client” to download SignalR JavaScript files needed for my client code.
After NPM package download is completed I will copy the downloaded files and paste them inside of wwwroot folder.

Writing the client code
Now that I have downloaded the JavaScript files necessary for SignalR to work on the browser, I will add the code in the index.html file.
First I will add the link to the SignalR Client JavaScript file to the section of the HTML file. And I will use the signalr-client-1.0.0-alpha2-final.js file.
<script src="signalr-client-1.0.0-alpha2-final.js"></script>
And after that, I will add the code to connect and log the message from the server on the console.
In the code, first I will create a HubConnection. And then I will start the HubConnection using the start method.
Finally, I will create a callback handler for the booking method triggered by the server. And on callback, I will log the incoming message into the console.
<script>
    var bookingHub = new signalR.HttpConnection(`/bookingHub`);
    var bookingConnection = new signalR.HubConnection(bookingHub);

    bookingConnection.start().catch(err => {
        console.log('connection error' + err);
    });

    bookingConnection.on('booking', (message) => {
        console.log('received message - ' + message);
    });
</script>
Update Startup to allow static files
To allow static files into the browser, I will update the Configure method and call UseDefaultFiles and UseStaticFiles methods on the IApplicationBuilder instance. UseDefaultFiles method will allow the index.html file and UseStaticFiles will allow the SignalR JavaScript file.
public void Configure(IApplicationBuilder app, IHostingEnvironment env)
{
    if (env.IsDevelopment())
    {
        app.UseDeveloperExceptionPage();
    }

    app.UseCors("CorsPolicy");

    app.UseSignalR(routes => {
        routes.MapHub<BookingHub>("bookingHub");
    });

    app.UseDefaultFiles();
    app.UseStaticFiles();

    app.ApplicationServices.GetService<BookingMessageRelay>();
}
Finally, I will run the application and check the output in the browser log.

Integrate Kafka and Reactive Extensions with SignalR
Finally, I will integrate the Reactive Extension and Kafka streaming that I built. For that, I will change the ConfigureServices method of the Startup class and add BookingConsumer and BookingStream to the ASP.Net Core DI.
services.AddSingleton<IBookingStream, BookingStream>();
services.AddSingleton<Action<string>>((m) => Console.WriteLine(m));
services.AddSingleton<IBookingConsumer, BookingConsumer();
Furthermore, I will update the Configure method of the Startup class to start the BookingConsumer in a separate thread to listen to Kafka stream.
Task.Factory.StartNew(() => app.ApplicationServices.GetService<IBookingConsumer>().Listen());
Now I will update the implementation of BookingMessageRelay constructor, ton accept IBookingStream. And register to the Reactive Extension stream calling the Subscribe method. Finally, on the callback, write the message into SignalR hub.
public class BookingMessageRelay
{
    public BookingMessageRelay(IHubContext<BookingHub> hubContext, IBookingStream bookingStream)
    {
        bookingStream.Subscribe("Booking_Relay", (m) => hubContext.Clients.All.InvokeAsync("booking", m.Message));
    }
}
Test integrated end to end solution
I will publish a message on the Kafka producer and see it showing in the browser console.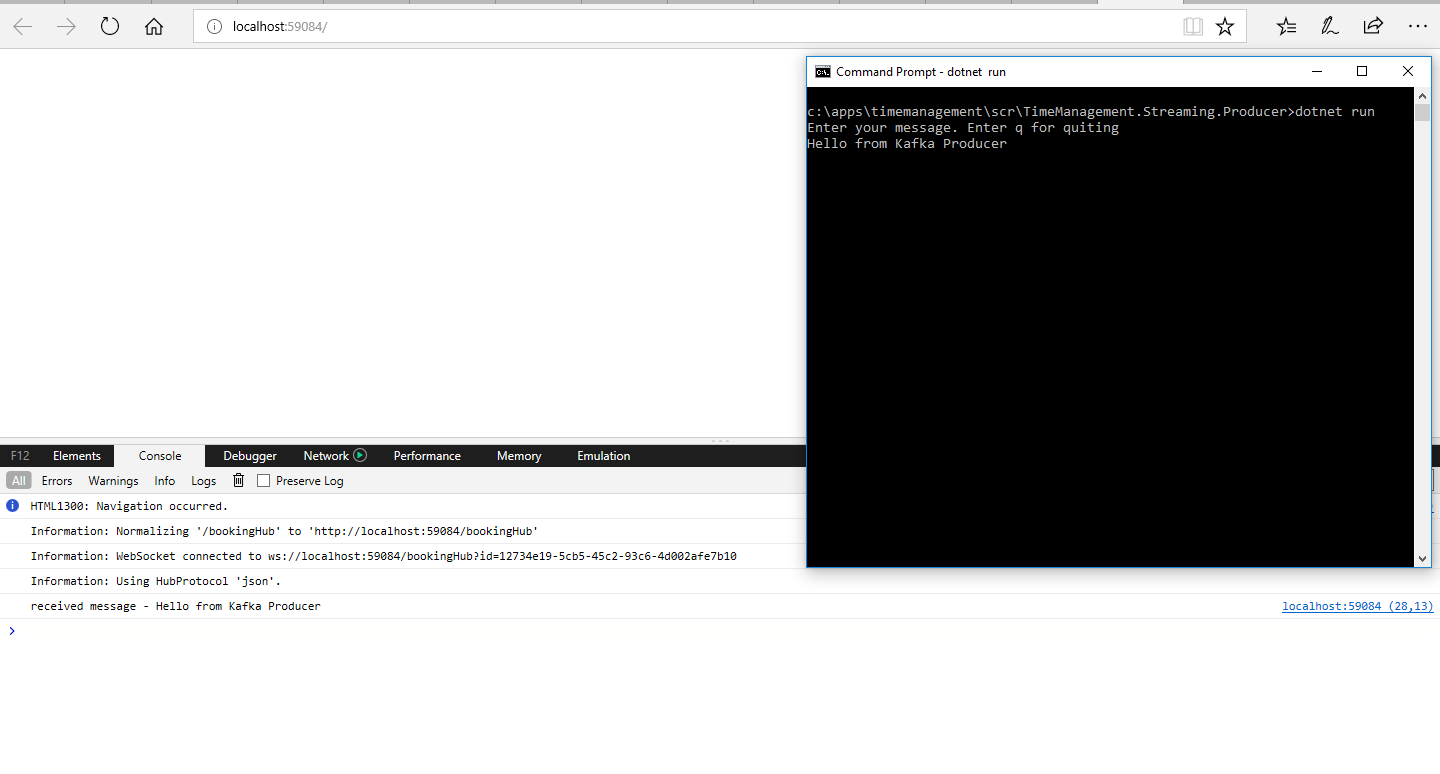
Conclusion
Implementing real-time web applications using ASP.Net Core SignalR is extremely simple and easy. The way I have created the HTML application, usually, I will not do that. I will usually use a SPA framework like Angular or React. But for simplicity, I have kept it this way. In my next post, I will implement an Angular SPA application and integrate SignalR into that.
Furthermore, I have created a YouTube video. And in this video, I have recorded the steps I followed for creating the .Net Core SignalR server and client.
YouTube video: https://youtu.be/EFILQUIpKGU
References:
SignalR: https://www.asp.net/signalr
Node: https://nodejs.org/en/