SQLite is a small, fast, full-featured SQL database engine, that is written in C. And it runs in the same process as the application itself. It is highly reliable and self-contained. In this blog post, I am going to walk through how to use SQLite with Dapper (a Micro-ORM).
Just like any other database, if we want to use the SQLite database engine from an ASP.NET Core application, we will need to work with either ADO.NET or an ORM Framework.
Dapper is a high-performance micro-ORM. and it is one of the easiest to use ORM framework in my opinion. It is built with extension methods on the IDBConnection interface. And it works with most of the popular RDBMS databases out there.
To learn more about how to use Dapper in an ASP.NET Core Application, you can check out my blog post about it here.
An Application to use SQLite with Dapper
To start this example, first of all I will create a new ASP.NET Core Web API Application.
Firstly, to do that, I will open up Visual Studio 2019. Once Visual Studio opens up, I will select the menu File -> New -> Project. This will open the Create a new Project project popup window.
Secondly, in the Create a new Project popup window, I will select ASP.NET Core Web Application from the project template and click on the Next button.
Thirdly, on the next page, I will provide the name of the application as SqliteDapper.Demo and click on the Create button.
Finally, on the final page, I will select the API template option. And I will keep other values default (ASP.Net Core 3.1) and click on the Create button.
NuGet Packages needed
Once the project is ready, I will need to install the necessary NuGet packages. For this demonstration, we will need the following two NuGet packages:
- Microsoft.Data.Sqlite – This NuGet package is required for SQLite database
- Dapper – This NuGet package is required for Dapper
I will install both the packages using the NuGet Package manager of Visual Studio.
The version I will install for Microsoft.Data.Sqlite is 3.1.6 as of writing this blog post.
And the version I will install for Dapper is 2.0.35 as of writing this blog post.
Database Setup
Once the NuGet packages are installed, it is time to write code to set up the database with tables needed for this demonstration. Now for this project created I am going to use a File-based option for SQLite.
Tough we can use SQLite to store data only in memory as well. The in-memory version of SQLite comes very handy for unit testing.
For creating the database tables, we can use migration like FluentMigrator. But for this demonstration, I am going to use plain SQL statements along with Dapper for creating SQLite tables.
Database Connection
I will keep the database file name (the complete connection string to the SQLite database) in the configuration file.
{
  "Logging": {
    "LogLevel": {
      "Default": "Information",
      "Microsoft": "Warning",
      "Microsoft.Hosting.Lifetime": "Information"
    }
  },
  "DatabaseName": "Data Source=Product.sqlite"
}
For keeping all database migration-related types, I will create a folder “Database” inside the project. And for the ease of dependency injection, I will create a class DatabaseConfig inside the “Database” folder.
The DatabaseConfig class will have a single property, Name. The Name property will contain the database connection configuration. I will set it up later in the Startup class.
namespace SqliteDapper.Demo.Database
{
    public class DatabaseConfig
    {
        public string Name { get; set; }
    }
}
DatabaseBootstrap class
For the demonstration, I will create a single table Product in the SQLite database. And use Dapper to create and read records from the database table.
To create the table Product when the application starts up, I will create a new class DatabaseBootstrap inside the “Database” folder.
The DatabaseBootstrap class will have a single method Setup. And the DatabaseBootstrap class will implement the interface IDatabaseBootstrap.
The DatabaseBootstrap class will have a constructor, and the constructor will have a dependency on the DatabaseConfig class for accessing the database connection string from the configuration.
Inside the Setup method, I will first create a connection to the SQLite database passing the connection from config.
Once the connection is established, I will check if the table already exists or not. If it exists, then I will not do anything. And if the table does not exist, then I will create the table.
For the Product table, I will keep only two columns Name and Description for simplicity.
Since I am not specifying any primary key, the SQLite will create the auto-generated primary key rowid. Which is an auto-incremented identity column created by SQLite to tables where we do not specify any primary key.
namespace SqliteDapper.Demo.Database
{
    public interface IDatabaseBootstrap
    {
        void Setup();
    }
}

using Dapper;
using Microsoft.Data.Sqlite;
using System.Linq;

namespace SqliteDapper.Demo.Database
{
    public class DatabaseBootstrap : IDatabaseBootstrap
    {
        private readonly DatabaseConfig databaseConfig;

        public DatabaseBootstrap(DatabaseConfig databaseConfig)
        {
            this.databaseConfig = databaseConfig;
        }

        public void Setup()
        {
            using var connection = new SqliteConnection(databaseConfig.Name);

            var table = connection.Query<string>("SELECT name FROM sqlite_master WHERE type='table' AND name = 'Product';");
            var tableName = table.FirstOrDefault();
            if (!string.IsNullOrEmpty(tableName) && tableName == "Product")
                return;

            connection.Execute("Create Table Product (" +
                "Name VARCHAR(100) NOT NULL," +
                "Description VARCHAR(1000) NULL);");
        }
    }
}
Creating and retrieving record from SQLite
Now that the database table is ready, it is time to create and retrieving data from the database.
I will create a new folder “ProductMaster” in the project. I will keep all the files for data retrieval and creation inside of this folder.
Inside the “ProductMaster”, I will first create the Product model class. The Product class will have three properties. The Id of the Product, which is the rowid provided by the SQLite, and it is an integer. The Name of the product, which is a string. And finally the Description of the product, which is also a string.
namespace SqliteDapper.Demo.ProductMaster
{
    public class Product
    {
        public int Id { get; set; }
        public string Name { get; set; }
        public string Description { get; set; }
    }
}
Creating Product data in SQLite database
For creating data in the Product table of the SQLite database, I will create a new class ProductRepository. This class will have a single method Create. The class ProductRepository will implement the interface IProductRepository.
The Create method will be an async method. And the Create method will take the Product object as an input parameter.
Inside the Create method of the ProductRepository class, I will first create a new insistence of SqliteConnection to establish a connection to the SQLite database.
Once the connection is established, I will use the ExecuteAsync extension method on the IDBConnection instance provided by Dapper, to create a new Product record in the Product table.
using System.Threading.Tasks;

namespace SqliteDapper.Demo.ProductMaster
{
    public interface IProductRepository
    {
        Task Create(Product product);
    }
}
using Dapper;
using Microsoft.Data.Sqlite;
using SqliteDapper.Demo.Database;
using System.Threading.Tasks;

namespace SqliteDapper.Demo.ProductMaster
{
    public class ProductRepository : IProductRepository
    {
        private readonly DatabaseConfig databaseConfig;

        public ProductRepository(DatabaseConfig databaseConfig)
        {
            this.databaseConfig = databaseConfig;
        }

        public async Task Create(Product product)
        {
            using var connection = new SqliteConnection(databaseConfig.Name);

            await connection.ExecuteAsync("INSERT INTO Product (Name, Description)" +
                "VALUES (@Name, @Description);", product);
        }
    }
}
Retrieving Product data from SQLite database
Once we have the class to create a Product record in the Product table, it is time to create a class to retrieve the data from the table inside the SQLite with Dapper.
For data retrieval, I will create a new class ProductProvider. The class ProductProvider will have a single method Get, which will return all the product information from the Product table. The class ProductProvider will implement the interface IProductProvider.
The Get method will be an async method and it will return IEnumerable of Product. It will not take any input parameters, since it will return all the products in the Product table in the SQLite database.
Inside the Get method, I will first establish a new connection to the SQLite database. For establishing a new connection, I will create a new instance of the SqliteConnection class.
Once the connection is established, I will use the QueryAsync extension method of Dapper on the IDBConnection instance to retrieve the Product information from the Product table in the SQLite database.
using System.Collections.Generic;
using System.Threading.Tasks;

namespace SqliteDapper.Demo.ProductMaster
{
    public interface IProductProvider
    {
        Task<IEnumerable<Product>> Get();
    }
}
using Dapper;
using Microsoft.Data.Sqlite;
using SqliteDapper.Demo.Database;
using System.Collections.Generic;
using System.Threading.Tasks;

namespace SqliteDapper.Demo.ProductMaster
{
    public class ProductProvider : IProductProvider
    {
        private readonly DatabaseConfig databaseConfig;

        public ProductProvider(DatabaseConfig databaseConfig)
        {
            this.databaseConfig = databaseConfig;
        }

        public async Task<IEnumerable<Product>> Get()
        {
            using var connection = new SqliteConnection(databaseConfig.Name);

            return await connection.QueryAsync<Product>("SELECT rowid AS Id, Name, Description FROM Product;");
        }
    }
}
Creating new API Controller
Now that classes for both saving and retrieving of data into and from SQLite with Dapper are ready, it is time to expose these classes through an external API. So that we can save as well as retrieve Product information through HTTP endpoint.
To achieve this, we will create a new controller class to expose these components. I will name the new controller as ProductController.
The ProductController class will contain a constructor for creating dependency on the IProductProvider and the IProductRepository interfaces. This is needed so that the ProductController class can use these interfaces for saving and retrieving data through its GET and POST HTTP methods.
The HTTP GET method of the controller will use the instance of the interface IProductProvider to return all the Products from the Product table. Hence it will return an IEnumerable of the Product type.
And the HTTP POST method of the controller will use an instance of the interface IProductRepository to save new Products into the Product table of the SQLite database. Hence it will have a Product instance as an input parameter.
using System.Collections.Generic;
using System.Threading.Tasks;
using Microsoft.AspNetCore.Mvc;
using SqliteDapper.Demo.ProductMaster;

namespace SqliteDapper.Demo.Controllers
{
    [Route("api/[controller]")]
    [ApiController]
    public class ProductController : ControllerBase
    {
        private readonly IProductProvider productProvider;
        private readonly IProductRepository productRepository;

        public ProductController(IProductProvider productProvider,
            IProductRepository productRepository)
        {
            this.productProvider = productProvider;
            this.productRepository = productRepository;
        }

        // GET: api/<ProductController>
        [HttpGet]
        public async Task<IEnumerable<Product>> Get()
        {
            return await productProvider.Get();
        }


        // POST api/<ProductController>
        [HttpPost]
        public async Task Post([FromBody] Product product)
        {
            await productRepository.Create(product);
        }
    }
}
Wiring up in Startup
Now we are done with all the code needed to access SQLite with Dapper. It is now the time to wire all the types up in the dependency injection container.
To achieve this, I will update the ConfigureServices method of the Startup class to register all the new classes and interfaces created into the dependency injection container.
// This method gets called by the runtime. Use this method to add services to the container.
public void ConfigureServices(IServiceCollection services)
{
    services.AddControllers();

    services.AddSingleton(new DatabaseConfig { Name = Configuration["DatabaseName"] });

    services.AddSingleton<IDatabaseBootstrap, DatabaseBootstrap>();
    services.AddSingleton<IProductProvider, ProductProvider>();
    services.AddSingleton<IProductRepository, ProductRepository>();
}
Finally, I will update the Configure method of the Startup class to set up the database by creating the Product table.
To do that, I will first update the Configure method to accept a new parameter of the type IServiceProvider. Once I add this new parameter, the .Net Core framework will pass an instance of IServiceProvider to this method.
And finally, at the end of the Configure method, I will get a handle to the IDatabaseBootstrap from the dependency injection container. I will use the GetService generic method of the IServiceProvider instance to achieve this.
And once I get the instance of IDatabaseBootstrap, I will call the Setup method on the instance to set up the database bt creating the Product table. That will create the Product table if it does not yet exist.
// This method gets called by the runtime. Use this method to configure the HTTP request pipeline.
public void Configure(IApplicationBuilder app,
            IWebHostEnvironment env,
            IServiceProvider serviceProvider)
{
    if (env.IsDevelopment())
    {
        app.UseDeveloperExceptionPage();
    }

    app.UseHttpsRedirection();

    app.UseRouting();

    app.UseAuthorization();

    app.UseEndpoints(endpoints =>
    {
        endpoints.MapControllers();
    });

    serviceProvider.GetService<IDatabaseBootstrap>().Setup();
}
Running the application
Now I will run the application to check the result. To test out if everything is working as expected, first of all, I will create a new Product in the Product table in the SQLite database. To create a new Product I will need to use the HTTP POST method of the ProductController class.
I will use Postman to fire the HTTP POST request to the https://localhost:5001/api/product endpoint. And in the request body, I will pass the Product information in the form of JSON.
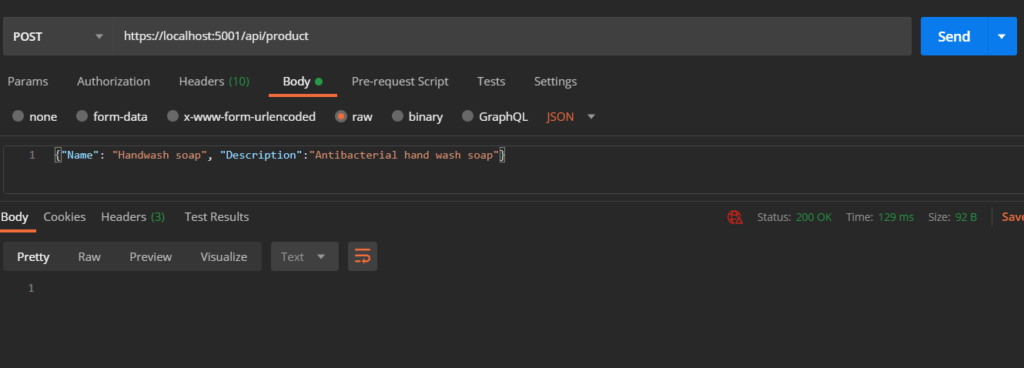
When I send the Postman request to the Product API, I can see 200 response back from the server. This confirms the Product is added successfully to the Product table.
Next, I will hit the URL https://localhost:5001/api/product in the browser to see the newly inserted Product information. This will trigger an HTTP GET call to the ProductController class.

And I can see the product information showing up as expected in the browser.
Conclusion
Working with SQLite with Dapper is a breeze. It is super simple and extremely stable. When it comes to Dapper, there is nothing special that needs to be done for it to work with SQLite.
I was pleasantly surprised at how easy it was to get Dapper to work with SQLite. We just needed to install a couple of NuGet packages, and after that, it was very straight forward implementation.
I have captured the entire coding session in a video and it is available on YouTube here.
The source code for this blog post is available on my GitHub here.