In the age of cloud computing and agile development, continuous deployment is key to success in any product. But the main bottleneck comes with deploying databases, where usually human intervention is needed to do so. FluentMigrator comes to rescue us here.
FluentMigrator is a database migration framework for .Net Framework and .Net Core. In this blog post, I will cover using FluentMigrator with an ASP.Net Core application.
In this blog, I will work through creating an application, which will create a database and its table as a part of the program running and manage versions of database changes in code using FluentMigrator.
Using FluentMigrator in ASP.Net Core
First of all, I will create a new ASP.Net Core Web API application. To do that, I will open up Visual Studio 2019. Once Visual Studio opens up, I will select the menu File -> New -> Project. This will open the Create a new Project project popup window.
Secondly, in the Create a new Project popup window, I will select ASP.NET Core Web Application from the project template and click on the Next button.
Thirdly, on the next page, I will provide the name of the application as FluentMigrator.Demo and click on the Create button.
Finally, on the final page, I will select the API template option. And I will keep other values default (ASP.Net Core 3.1) and click on the Create button.
Adding NuGet Package
Once the project is ready, I will add the FluentMigrator Nuget package to the newly created project. To do so, I will right-click on the FluentMigrator.Demo project and select the option Manage NuGet Packages…
This will open up the NuGet package manager window. In the Browse tab of the NuGet package manager window, I will search for FluentMigrator.Runner NuGet package.
I will install version 3.2.6 of FluentMigrator.Runner NuGet package into the project. The FluentMigrator.Runner NuGet package has a dependency on the core FluentMigrator NuGet package. Hence we do not have to separately install the FluentMigrator NuGet package.
The FluentMigrator.Runner NuGet package also has a dependency on FluentMigrator.Runner.SqlServer NuGet package, which will be needed in our case. Since we will use SQL Server as our database.
Creating the Database
Since we want to ensure that the entire process is automated, hence the database creation also will be automated. This will ensure that we can install the product we are building anywhere without any dependency.
But, the FluentMigrator does not provide an option to create a database. After digging through the web, I saw there was an issue in GitHub. Which clearly mentions that this is out of the scope of the product.
Hence, we will build our own implementation for database creation. This will be a simple class whose responsibility is to check if the database exists on the server. If not then create the database.
Database class
Before we get into any code, first I will create a new folder and name it as Migrations. I will keep all the database migration-related classes inside of this folder.
I will create a new static class Database inside the Migrations folder. And this Database class will have a single method EnsureDatabase.
The method EnsureDatabase will accept two string input parameters.
- The first parameter is for the connection string to the master database on the server.
- And the second parameter is the name of the database Demo to create if it does not exist.
The implementation of the EnsureDatabase method will be very simple. Using the SQL query, first, we will check if the database exists in the sys.databases table. If it does not exist we will create the database.
For executing the SQL queries I will use Dapper, a micro ORM. I have a couple of blogs on Dapper, you can check them out if you need more details in Dapper.
- ASP.Net Core Web API Application with Dapper – Part 1
- ASP.Net Core Web API Application with Dapper – Part 2
Installing Dapper NuGet package
For installing Dapper NuGet package, I will right-click on the project and select Manage NuGet Packages… option. Once the package manager window opens up, I will search for Dapper in the Browse window.
I will install version 2.0.35 of Dapper NuGet package.
The Code to create Database
Finally, I will finish the code for creating a new database inside the EnsureDatabase method.
using Dapper;
using System.Data.SqlClient;
using System.Linq;

namespace Fluentmigration.Demo.Migrations
{
    public static class Database
    {
        public static void EnsureDatabase(string connectionString, string name)
        {
            var parameters =new DynamicParameters();
            parameters.Add("name", name);
            using var connection = new SqlConnection(connectionString);
            var records = connection.Query("SELECT * FROM sys.databases WHERE name = @name",
                 parameters);
            if (!records.Any())
            {
                connection.Execute($"CREATE DATABASE {name}");
            }
        }
    }
}
Creating tables using FluentMigrator
The naming convention I am going to use for migration classes will be Migration_yyyyMMddHHmmss.cs. This will also help to sort the files in Visual Studio from earliest to latest.
For the project in hand, let us consider we will create a table called Employee, which will contain information of an employee. For simplicity, this table will have only four columns.
- Firstly, the Id, which is an autogenerated Identity column and primary key.
- Secondly, FirstName, which will contain the first name of the employee.
- Thirdly, LastName, which will contain the last name of the employee.
- Finally, Age, which will contain the age of the employee.
To achieve we will create a new class Migration_20200601100000.
Implementation of Migration_20200601100000
The class Migration_20200601100000 will derive from the abstract Migration base class of FluentMigrator. And we will also add the attribute Migration to the class. The Migration attribute takes a long, which is the id of the migration. For that, we will pass the same number 20200601100000.
The Migration base class has two abstract methods, Up and Down, which we will implement inside of the Migration_20200601100000 class.
The Migration base class also provides multiple properties, but we will focus mainly on Create and Delete properties for the time being. We will use these properties to create and delete the tables.
using FluentMigrator;
using FluentMigrator.SqlServer;

namespace Fluentmigration.Demo
{
    [Migration(20200601100000)]
    public class Migration_20200601100000 : Migration
    {
        public override void Down()
        {
            Delete.Table("Employee");
        }

        public override void Up()
        {
            Create.Table("Employee")
                .WithColumn("Id").AsInt32().NotNullable().PrimaryKey().Identity(1, 1)
                .WithColumn("FirstName").AsString().NotNullable()
                .WithColumn("LastName").AsString().NotNullable()
                .WithColumn("Age").AsInt32().Nullable();
        }
    }
}
Update Startup for FluentMigrator
Now that both class for database creation and the table migration is ready, it is time to update the Startup class to add FluentMigrator.
Update ConfigureServices
Firstly, we will update the ConfigureServices method of the Startup class to add FluentMigrator to the dependency injection container.
Secondly, we will use the extension method AddFluentMigratorCore to add the FluentMigrator to the dependency injection container.
Thirdly, we will call AddLogging to add console logging for FluentMigrator so that we can see the SQL statements executed by FluentMigrator. And to do that we will use the ILoggingBuilder Action of the AddLogging method and call AddFluentMigratorConsole on the ILoggingBuilder instance.
Finally, we will call ConfigureRunner to configure the migration runner. The ConfigureRunner method provides an Action which provides an instance of IMigrationRunnerBuilder instance. We will use IMigrationRunnerBuilder to do the following:
- Firstly, call
AddSqlServer2012to add the SQL server 2012 support. - Secondly, call
WithGlobalConnectionStringand pass the connection string to the database. - Finally, call
ScanInto provide the assembly where the migration classes are available. And I will passAssembly.GetExecutingAssembly(), since the migration classes are inside of the current assembly.
public void ConfigureServices(IServiceCollection services)
{
    services.AddControllers();

    services
        .AddLogging(c => c.AddFluentMigratorConsole())
        .AddFluentMigratorCore()
        .ConfigureRunner(c => c
            .AddSqlServer2012()
            .WithGlobalConnectionString("Persist Security Info = False; Integrated Security = true; Initial Catalog = Demo; server = .\\SQLEXPRESS")
            .ScanIn(Assembly.GetExecutingAssembly()).For.All());
}
IApplicationBuilder Migration runner extension method
For running the actual migration, I will create a new static class called MigrationExtension inside of the Migrations folder. This static class will have a single extension method called Migrate on IApplicationBuilder.
Inside of the Migrate method, firstly we will create an instance of IServiceScope by calling the CreateScope method on ApplicationServices property of the IApplicationBuilder instance.
Secondly, we will get an instance of the IMigrationRunner from the dependency injection container calling the GetService method on the ServiceProvider property of the IServiceScope instance.
Thirdly, we will call the ListMigrations method on the IMigrationRunner, which will list out all the eligible migrations in the solution. The ListMigrations method will print out the eligible migrations.
Finally, we will call MigrateUp on the IMigrationRunner instance to create the table in the database.
using FluentMigrator.Runner;
using Microsoft.AspNetCore.Builder;
using Microsoft.Extensions.DependencyInjection;

namespace Fluentmigration.Demo.Migrations
{
    public static class MigrationExtension
    {
        public static IApplicationBuilder Migrate(this IApplicationBuilder app)
        {
            using var scope = app.ApplicationServices.CreateScope();
            var runner = scope.ServiceProvider.GetService<IMigrationRunner>();
            runner.ListMigrations();
            runner.MigrateUp(20200601100000);
            return app;
        }
    }
}
Update Configure
In the Configure method of the Startup class, I will perform two operations:
- Firstly, I will call
EnsureDatabaseof the Database class, to ensure that if the database is not available, then create it. - Secondly, I will call the extension method
MigrateI created earlier on theIApplicationBuilderinstance.
public void Configure(IApplicationBuilder app, IWebHostEnvironment env)
{
    if (env.IsDevelopment())
    {
        app.UseDeveloperExceptionPage();
    }

    app.UseHttpsRedirection();

    app.UseRouting();

    app.UseAuthorization();

    app.UseEndpoints(endpoints =>
    {
        endpoints.MapControllers();
    });

    Database.EnsureDatabase("Persist Security Info = False; Integrated Security = true; Initial Catalog = master; server = .\\SQLEXPRESS",
        "Demo");

    app.Migrate();
}
Now once this is completed, I will run the application. And I will see the following console response.
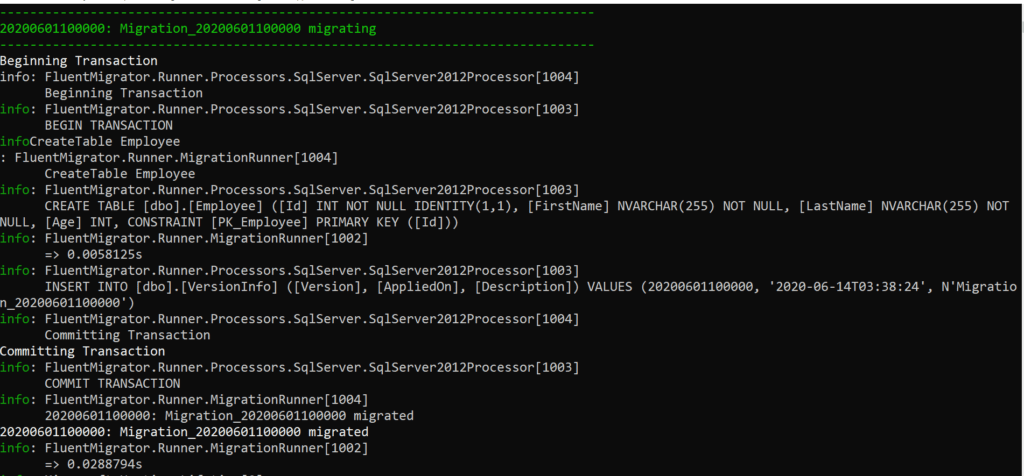
As you can see from the console output, it is printing out the SQL statements to create the Employee table.
Note, there were a couple of other sections, which I have not provided a picture of. That section shows the SQL statement for creating the table VersionInfo. The table VersionInfo keeps a track of all the migrations.
And the other section was the section which just prints out the eligible migrations of the assembly. This is the result of calling the ListMigrations method.
The Output
Now, if I refresh the database, I can see the Employee table is created with all the expected columns.
And also the table VersionInfo was created by FluentMigrator for keeping a track of all the migrations.
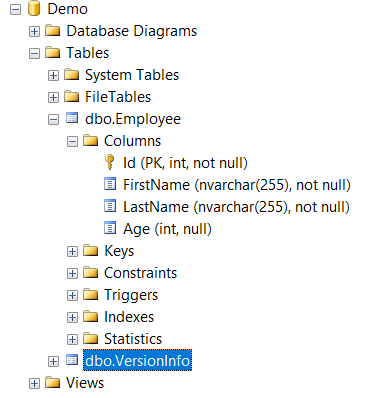
And if I run a query against the VersionInfo database, I will see the version with 20200601100000, and the class name is added to the table.

Rolling back changes
If we want to roll back the change we just did, meaning we want to delete the table created, we can achieve it very easily. All we have to do is to update the MigrationExtension class to call MigrateDown on the IMigrationRunner instance.
The MigrateDown accepts a parameter, which is the id of the migration to downgrade to. Since this is the first migration, now we have to go down, we will pass 0 for this parameter.
using FluentMigrator.Runner;
using Microsoft.AspNetCore.Builder;
using Microsoft.Extensions.DependencyInjection;

namespace Fluentmigration.Demo.Migrations
{
    public static class MigrationExtension
    {
        public static IApplicationBuilder Migrate(this IApplicationBuilder app)
        {
            using var scope = app.ApplicationServices.CreateScope();
            var runner = scope.ServiceProvider.GetService<IMigrationRunner>();
            runner.ListMigrations();
            runner.MigrateDown(0);
            return app;
        }
    }
}
Now if I run the application, I will see the Employee table is removed from the Demo database. And also the VersionInfo table will not contain any records.
Adding relationship between tables
Now, that we created the Employee table, let us create a new table called Address. The Address table will hold the address of all employees.
The Address table will have the following columns:
- Firstly, the
Id, with is an auto-generated primary key - Secondly,
Streetwhich is the street name - Thirdly,
Citywhich is the name of the city - Fourthly,
Statewhich is the name of the state - Fifthly,
Zipwhich is the zip code - Finally,
EmployeeIdwhich is the id of the employee from the Employee table
The EmployeeId column in the Address table will be the foreign key in the Address table. And will associate with the Id column of the Employee table.
Address migration class
To create this new migration, I will create a new class. I will name the class as Migration_06072020101000.
Inside of the class, the creation of the table and its column will look similar to the employee migration class. I will use the same properties and methods for creating columns and tables.
There will be couple of new items that I will introduce here.
The first one is the ForeignKey, which will create the foreign key on the EmployeeId column and associate it with the Id column of the Employee table.
The second one is using Index property to create a non-clustered index on the EmployeeId column of the Address table.
namespace FluentMigrator.Demo.Migrations
{
    [Migration(06072020101000)]
    public class Migration_06072020101000 : Migration
    {
        public override void Down()
        {
            Delete.Index("IX_Address_EmployeeId").OnTable("Address");
            Delete.Table("Address");
        }

        public override void Up()
        {
            Create.Table("Address")
                .WithColumn("Id").AsInt32().NotNullable().Identity().PrimaryKey()
                .WithColumn("Street").AsString().NotNullable()
                .WithColumn("City").AsString().NotNullable()
                .WithColumn("State").AsString().NotNullable()
                .WithColumn("Zip").AsString().Nullable()
                .WithColumn("EmployeeId").AsInt32().NotNullable().ForeignKey("Employee", "Id");

            Create.Index("IX_Address_EmployeeId")
                .OnTable("Address")
                .OnColumn("EmployeeId")
                .Ascending()
                .WithOptions().NonClustered();
        }
    }
}
The output
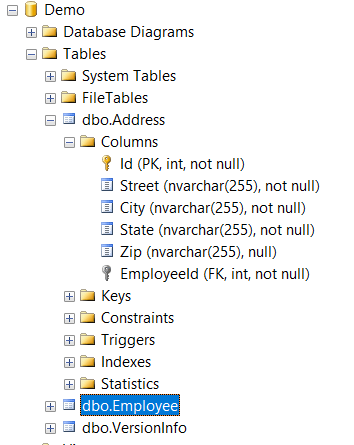
Now if I run the application, I will see the new address table is created. And also the foreign key is created for EmployeeId as expected.
Adding lookup or configuration data
There might be scenarios where we need to populate tables with data during migration. And this case is mostly valid for lookup tables and configuration tables.
FluentMigrator provides a very easy and convenient way to do this. To demonstrate this, I will create a new class Migration_06142020100000.
As a part of this new class Migration_06142020100000, we will create a new record in the Employee table. And during rollback, we will delete the same record.
To achieve this, FluentMigrator gives us two very intuitive and fluent API. Those are Insert for inserting a new record. And Delete for deleting the record.
namespace FluentMigrator.Demo.Migrations
{
    [Migration(06142020100000)]
    public class Migration_06142020100000 : Migration
    {
        public override void Down()
        {
            Delete.FromTable("Employee").Row(new { Name = "First Employee", Age = 25 });
        }

        public override void Up()
        {
            Insert.IntoTable("Employee").Row(new { Name = "First Employee", Age = 25 });
        }
    }
}
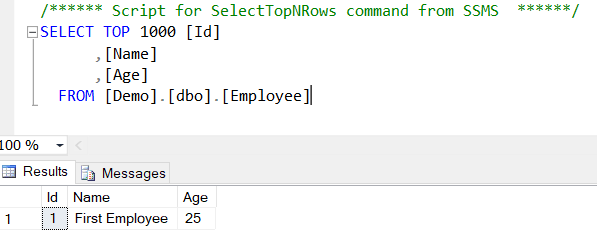
In the above code, I am adding an employee with the name “First Employee” and age 25. Now if I run the application, a new record will be created in the Employee table.
Update lookup or configuration data
The other scenario that I want to cover is the update of existing lookup or configuration data. And this is also a very common scenario. Just like the inserting feature, FluentMigrator provides a very easy and fluent API to do it.
I will create a new migration class Migration_06142020100500 to demonstrate this.
As you might have already expected, to update data, FluentMigrator provides a method Set. And on the return of Set, either we can provide a Where condition. Or we can update all rows using AllRows.
In our case, we will use Where condition and update the name of the employee with Id 1.
namespace FluentMigrator.Demo.Migrations
{
    [Migration(06142020100500)]
    public class Migration_06142020100500 : Migration
    {
        public override void Down()
        {
            Update.Table("Employee").Set(new { Name = "First Employee" })
                .Where(new { Id = 1 });
        }

        public override void Up()
        {
            Update.Table("Employee").Set(new { Name = "Second Employee" })
                .Where(new { Id = 1 });
        }
    }
}
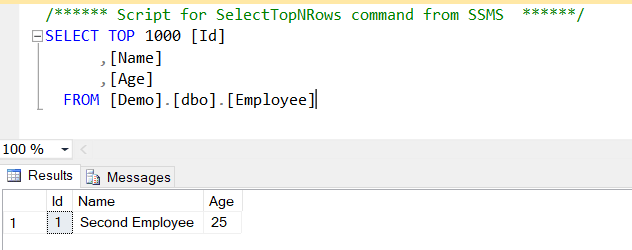
Now if I run the application, I will see that the name of the Employee is updated to “Second Employee”.
Conclusion
As the name suggests, FluentMigrator has really easy to use and understand fluent API. Even if you do not go through the API documentation, you can still build the application without any help. To me, that is a huge success for an API.
The source code for this blog is available here.
And I also have a couple of YouTube videos where I walk through the whole process. The videos are available in part 1 and part 2.