Hello everyone, welcome back to .Net Core Central. Today I am going to build a simple CRUD application using ASP.Net Core Web API and Dapper. I will create a Time Management software, and this post will be the first step towards it. In this post, I will create the basic GET API operation for viewing all employees of the Time Management system.
Just as in my last post, I will use Visual Studio 2017 Community edition for building this application. Please refer to my previous post Creating First ASP.Net Core Web API Application for more information.
What is Dapper?
Dapper is a micro ORM (Object Relational Mapper) built by the team over StackOverflow. Dapper provides multiple extension methods for the interface IDbConnection to do CRUD operations. The performance of Dapper is almost as good as plain old ADO.Net calls. Therefore Out of all the functions provided by Dapper, I find Query and Execute to be the two most used functions. As the name suggests, Query is used for Select operation in the database. And Execute is used for Insert/Update/Delete operations. Since Dapper does not have any database specific implementations, hence it can work with any databases. So far I have used it with SQL Server, PostgreSQL and SQLite with Dapper. For this post I am going to use SQL Server 2017 express edition.
Installing SQL Server 2017
Most importantly, we need SQL server to start the development. Hence, I will download the SQL Server 2017 express edition from url https://www.microsoft.com/en-us/sql-server/sql-server-downloads and install it. The SQL Server express edition can be used for both development as well as production for small servers. In addition, I will install the Management Studio from the link https://docs.microsoft.com/en-us/sql/ssms/download-sql-server-management-studio-ssms.
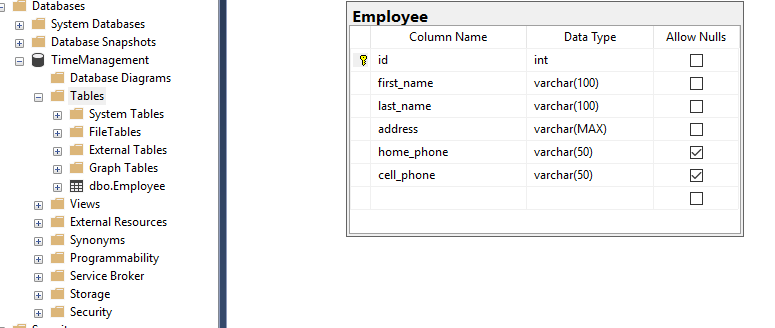
Database Schema
First of all, I will create a database named “TimeManagement”. After that, inside the database I will create a table named “Employee”. The table Employee has only five columns for simplicity. The columns are First Name, Last Name, Address, Home Phone and Cell Phone.
Installing Dapper Nuget
First of all, I will open the existing ASP.Net Core Web API application named “MyFirstWebApplication”, which is created in last post Creating First ASP.Net Core Web API Application . After that, I will rename the solution to “TimeManagement” and rename the project to “TimeManagement.Service”. Finally, I will create a new Class Library project into the solution named “TimeManagement.Data”. All data related code will be in “TimeManagement.Data” project.
I will add the Dapper nuget package into the “TimeManagement.Data” project using the nuget package manager. For opening the nuget package manager, right click on the project and then open the Manage Nuget Packages option. In the Package Manager window go to the Browse tab and search for Dapper and install it.
Data Layer
In TimeManagement.Data project, I will create a class EmployeeProvider for reading employee data from the database. EmployeeProvider will implement the interface IEmployeeProvider. And will name the DTO object for data transfer as Employee.
public class Employee
{
    public int Id { get; set; }
    public string FirstName { get; set; }
    public string LastName { get; set; }
    public string Address { get; set; }
    public string HomePhone { get; set; }
    public string CellPhone { get; set; }
}

public interface IEmployeeProvider
{
    IEnumerable Get();
}

public class EmployeeProvider : IEmployeeProvider
{
    private readonly string connectionString;

    public EmployeeProvider(string connectionString)
    {
        this.connectionString = connectionString;
    }

    public IEnumerable Get()
    {
        IEnumerable employee = null;

        using (var connection = new SqlConnection(connectionString))
        {
            employee = connection.Query("select id, first_name as FirstName, last_name as LastName, address, home_phone as HomePhone, cell_phone as CellPhone from Employee");
        }

        return employee;
    }
}
As you can see, I am using the Query<T> extension method from Dapper for getting all employees in the Employee database. The Query method internally opens the Connection and closes it. Therefore, I do not have to explicitly open or close the connection object. I am passing inline SQL query for reading Employee table. However, instead of inline query Stored Procedures can be used as well.
Service Layer
In the service layer, I will create a new Controller class named EmployeeController. In addition to that, inside the controller class, the IEmployeeProvider will be part of the constructor. The Get method of the controller will return response from the IEmployeeProvide.Get method.
[Produces("application/json")]
[Route("api/Employee")]
public class EmployeeController : Controller
{
    private readonly IEmployeeProvider employeeProvider;

    public EmployeeController(IEmployeeProvider employeeProvider)
    {
        this.employeeProvider = employeeProvider;
    }

    // GET: api/Employee
    [HttpGet]
    public IEnumerable Get()
    {
        return employeeProvider.Get();
    }

    // GET: api/Employee/5
    [HttpGet("{id}", Name = "Get")]
    public string Get(int id)
    {
        return "value";
    }

    // POST: api/Employee
    [HttpPost]
    public void Post([FromBody]string value)
    {
    }

    // PUT: api/Employee/5
    [HttpPut("{id}")]
    public void Put(int id, [FromBody]string value)
    {
    }

    // DELETE: api/ApiWithActions/5
    [HttpDelete("{id}")]
    public void Delete(int id)
    {
    }
}
The IEmployeeProvider will be registered into the ASP.Net Core container inside Startup class. In StartUp class, I will use ConfigureServices method for registration. Inside ConfigureServices In addition, I will use IServiceCollection.AddTransient method to register IEmployeeProvider into the container. Therefore, during the construction of EmployeeController the container will pass IEmployeeProvider .
public class Startup
{
    public Startup(IConfiguration configuration)
    {
        Configuration = configuration;
    }

    public IConfiguration Configuration { get; }

    // This method gets called by the runtime. Use this method to add services to the container.
    public void ConfigureServices(IServiceCollection services)
    {
        services.AddMvc();

        services.AddTransient(f => new EmployeeProvider(@"Persist Security Info = False; Integrated Security = true; Initial Catalog = TimeManagement; server = Nirjhar-Tab\SQLEXPRESS"));
    }

    // This method gets called by the runtime. Use this method to configure the HTTP request pipeline.
    public void Configure(IApplicationBuilder app, IHostingEnvironment env)
    {
        if (env.IsDevelopment())
        {
            app.UseDeveloperExceptionPage();
        }

        app.UseMvc();
    }
}
Conclusion
In conclusion, Dapper is an extremely simple but very powerful ORM, which comes without a lot of fan fair. Above all, I absolutely love it because of its simplicity. In my next post I will cover the Create/Update and Delete using Dapper. In this post I have also briefly touched upon the dependency injection concept. I will spend another post discussing the out of box DI container provided by ASP.Net Core.
In addition to the blog, I have a video with the steps followed for creating the application, here is the link to the YouTube video.
References
SQL Server 2017 Express download link: https://www.microsoft.com/en-us/sql-server/sql-server-downloads
Management Studio download link: https://docs.microsoft.com/en-us/sql/ssms/download-sql-server-management-studio-ssms
Tutorial for Dapper: http://dapper-tutorial.net/dapper
GitHub link for Dapper: https://github.com/StackExchange/Dapper
Dapper Nuget package: https://www.nuget.org/packages/Dapper