We all know the importance of API documentation. But in most cases, the API documentation is outside of code, and that ends up creating discrepancies between the API and its documentation. Swagger (OpenAPI specifications) solves exactly that problem. Swagger is an implementation of OpenAPI specifications. In the blog post, I am going to walk through implementing Swagger in an ASP.Net Core application.
The swagger specification defines how to format API descriptions for REST API. The ability for API’s to describe their structure and present it through a user interface is extremely powerful. And it also makes it seamless to keep API code and its documentation always in sync.
Implementing Swagger in ASP.Net Core Web API
For implementing swagger in ASP.Net Core, first, we will create a new project. For creating a new ASP.Net Core Web API, I will open Visual Studio 2019. Once Visual Studio is open, I will select the menu option File -> New -> Project.
Once the new project creation window pops up, I will select the ASP.Net Core Web Application. And then I will click on the Next button.
Secondly, on the next page of the pop-up, I will provide the name of the project in the Project Name field as HealthCheck.Demo. And then click on the Create button.
Finally, on the final page, I will select the API template option. And I will keep other values default (ASP.Net Core 3.1) and click on the Create button.
Adding NuGet Packages
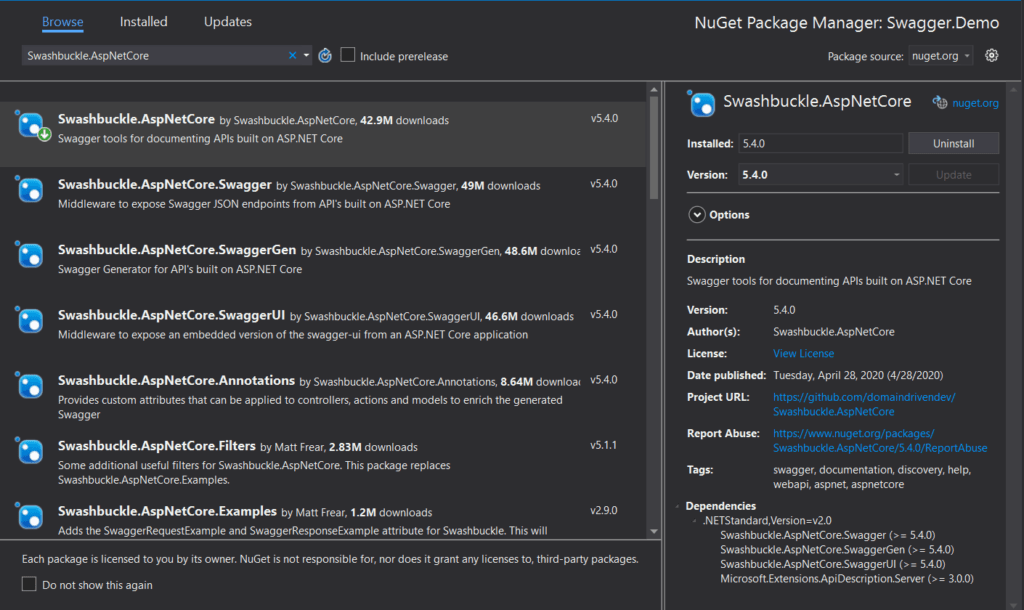
The NuGet package Swashbuckle provides the implementation of Swagger or OpenAPI Specification in .Net. For ASP.Net Core, we will add the NuGet package Swashbuckle.AspNetCore in our project.
At the time of writing this blog, the version of Swashbuckle.AspNetCore is 5.4.0.
Once we add the NuGet package to the project, we will configure Swagger inside the project.
Configuring Swagger in Startup class
Now, it is time to configure Swagger inside of the Startup class. For that, I will update the ConfigureServices to add Swagger.
I will use the extension method AddSwaggerGen on the IServiceCollection instance to add Swagger to the dependency injection container.
The AddSwaggerGen method takes an Action delegate. The Action delegate passes an instance of SwaggerGenOptions to configure Swagger.
Inside the Action, we will use the instance of SwaggerGenOptions and call the method SwaggerDoc on it. The SwaggerDoc method takes two parameters.
The first one is a string name, which is a URI-friendly name that uniquely identifies the swagger document. That means this will identify the path to the swagger.json file. I will pass “v1” for this parameter.
The second parameter is an instance of OpenApiInfo. Hence, I will create a new instance of the OpenApiInfo class. For this instance, I will set up Title, Description, and Version properties. There are other properties as well, which I will not set right now.
// This method gets called by the runtime. Use this method to add services to the container.
public void ConfigureServices(IServiceCollection services)
{
    services.AddControllers();

    services.AddSwaggerGen(options =>
    {
        options.SwaggerDoc("v1",
        new Microsoft.OpenApi.Models.OpenApiInfo
        {
            Title = "Swagger Demo API",
            Description = "Demo API for showing Swagger",
            Version = "v1"
        });
    });
}
Updating Configure method
Once we update the ConfigureServices method to add Swagger in the dependency injection container. Now it is time to add the Swagger middle-ware. For that, I will update the Configure method of the Startup class.
Firstly, I will call the UseSwagger extension method on the IApplicationBuilder instance to set up the swagger middle-ware.
Secondly, I will call the UseSwaggerUI extension method on the IApplicationBuilder instance to set up the swagger user interface middle-ware.
The UseSwaggerUI extension method takes an Action delegate as its parameter. The Action delegate gives an instance SwaggerUIOptions as its input parameter.
We will call the SwaggerEndpoint method on the SwaggerUIOptions to set the endpoint of the swagger.json file. The SwaggerEndpoint method takes two parameters. The first one is the URL of the swagger JSON file, for which I will pass “/swagger/v1/swagger.json”. And the second one is a string name, for which I will pass “Swagger Demo API”.
Finally, I will call the property RoutePrefix on the SwaggerUIOptions instance. The RoutePrefix identifies what is the URL for accessing the swagger user interface. I will set it as an empty string. This means, if I type the root URL in the browser, it will open the swagger user interface.
// This method gets called by the runtime. Use this method to configure the HTTP request pipeline.
public void Configure(IApplicationBuilder app, IWebHostEnvironment env)
{
    if (env.IsDevelopment())
    {
        app.UseDeveloperExceptionPage();
    }

    app.UseHttpsRedirection();

    app.UseRouting();

    app.UseAuthorization();

    app.UseEndpoints(endpoints =>
    {
        endpoints.MapControllers();
    });

    app.UseSwagger();

    app.UseSwaggerUI(options =>
    {
        options.SwaggerEndpoint("/swagger/v1/swagger.json", "Swagger Demo API");
        options.RoutePrefix = "";
    });
}
Creating a new API Controller
Now that Swagger configuration is complete, I will create a new API, for which we want to expose swagger documentation.
I will create a new controller with the name CustomerController. And let us say this controller is responsible for exposing the REST interface for Customer resources.
Note: I will delete the auto generated controller class WeatherForecastController.
Create new Controller
Firstly, for creating the new controller, I will right-click on the Controllers folder, and select the option Add -> Controller. Once the new controller popup appears, I will select the option “API Controller with read/write actions” and click “Add”.
Secondly, once the controller name popup appears, I will provide the name as CustomerController, and click “Add”.
using System.Collections.Generic;
using Microsoft.AspNetCore.Mvc;

namespace Swagger.Demo.Controllers
{
    [Route("api/[controller]")]
    [ApiController]
    public class CustomerController : ControllerBase
    {
        // GET: api/Customer
        [HttpGet]
        public IEnumerable<string> Get()
        {
            return new string[] { "value1", "value2" };
        }

        // GET: api/Customer/5
        [HttpGet("{id}", Name = "Get")]
        public string Get(int id)
        {
            return "value";
        }

        // POST: api/Customer
        [HttpPost]
        public void Post([FromBody] string value)
        {
        }

        // PUT: api/Customer/5
        [HttpPut("{id}")]
        public void Put(int id, [FromBody] string value)
        {
        }

        // DELETE: api/ApiWithActions/5
        [HttpDelete("{id}")]
        public void Delete(int id)
        {
        }
    }
}
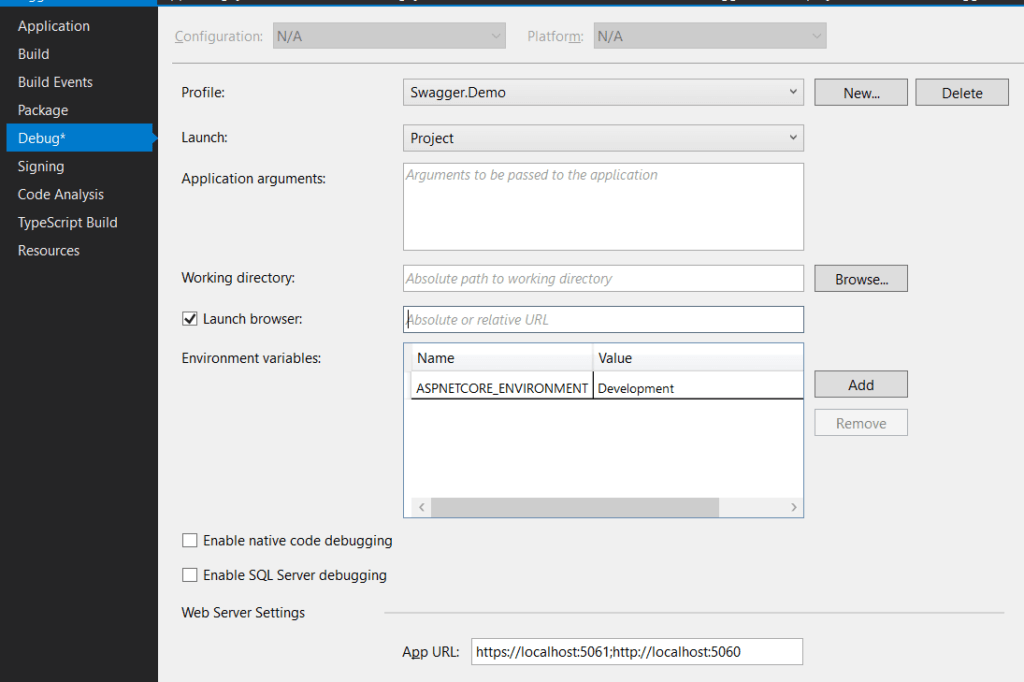
Thirdly, I will also update the project debug property to set the default launch URL as root. For that, I will open the project properties page, by right-clicking on the project and selecting the Properties option.
Once the project properties page opens, I will select the “Debug” option. And inside the Debug option page, I will empty the text box (Absolute or relative URL) next to the Launch browser: option.
Finally, once the controller is created and project options are set up, I will simply run the application to see the behavior of swagger documentation.
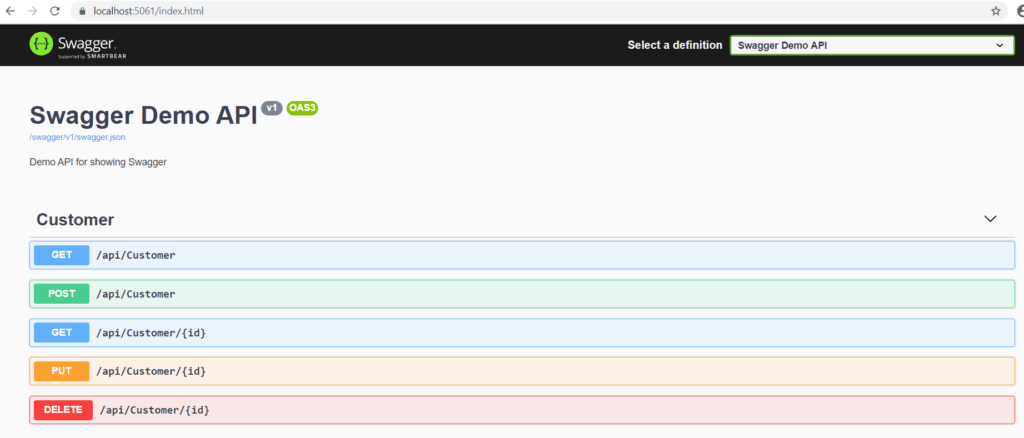
As we can see above the Swagger User Interface is exposing all the API that is part of the consumer controller. But at this point there is no documentation, it simply exposes the API. So now let us work on adding documentation.
Adding documentation to controller class
For adding documentation and showing them up in the swagger user interface, we will use standard .Net Core class and method documentation. Which is using /// to create the comment block.
Inside of the comment block, when we define something in the <summary> tag, it appears along the API path.
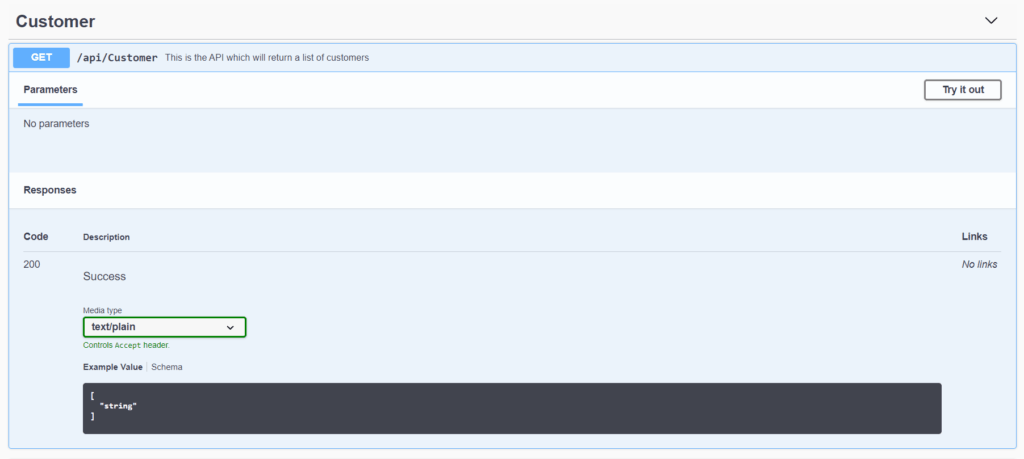
To demonstrate that I will add a <summary> section to the CustomerController class Get method.
/// <summary>
/// This is the API which will return a list of customers
/// </summary>
/// <returns></returns>
[HttpGet]
public IEnumerable<string> Get()
{
    return new string[] { "value1", "value2" };
}
Now, if I run the application, I still do not see any documentation. So why is that?
It is because, we will have to tell swagger, where to pick up the documentation file from. Hence we will now have to update the Startup class again.
Wiring up documentation
Now, I will update the ConfigureServices method inside the Startup class to configure the comment XML file path. And for that I inside of the AddSwaggerGen method call, I will call the IncludeXmlComments method on SwaggerGenOptions instance.
The IncludeXmlComments method accepts a file path for the XML comment. And I will get the file path from the executing assembly’s base path.
var fileName = $"{Assembly.GetExecutingAssembly().GetName().Name}.xml";
var filePath = Path.Combine(AppContext.BaseDirectory, fileName);
options.IncludeXmlComments(filePath);
The complete implementation of Startup class below:
using System;
using System.IO;
using System.Reflection;
using Microsoft.AspNetCore.Builder;
using Microsoft.AspNetCore.Hosting;
using Microsoft.Extensions.Configuration;
using Microsoft.Extensions.DependencyInjection;
using Microsoft.Extensions.Hosting;

namespace Swagger.Demo
{
    public class Startup
    {
        public Startup(IConfiguration configuration)
        {
            Configuration = configuration;
        }

        public IConfiguration Configuration { get; }

        // This method gets called by the runtime. Use this method to add services to the container.
        public void ConfigureServices(IServiceCollection services)
        {
            services.AddControllers();

            services.AddSwaggerGen(options =>
            {
                options.SwaggerDoc("v1",
                    new Microsoft.OpenApi.Models.OpenApiInfo
                    {
                        Title = "Swagger Demo API",
                        Description = "Demo API for showing Swagger",
                        Version = "v1"
                    });

                var fileName = $"{Assembly.GetExecutingAssembly().GetName().Name}.xml";
                var filePath = Path.Combine(AppContext.BaseDirectory, fileName);
                options.IncludeXmlComments(filePath);
            });
        }

        // This method gets called by the runtime. Use this method to configure the HTTP request pipeline.
        public void Configure(IApplicationBuilder app, IWebHostEnvironment env)
        {
            if (env.IsDevelopment())
            {
                app.UseDeveloperExceptionPage();
            }

            app.UseHttpsRedirection();

            app.UseRouting();

            app.UseAuthorization();

            app.UseEndpoints(endpoints =>
            {
                endpoints.MapControllers();
            });

            app.UseSwagger();

            app.UseSwaggerUI(options =>
            {
                options.SwaggerEndpoint("/swagger/v1/swagger.json", "Swagger Demo API");
                options.RoutePrefix = "";
            });
        }
    }
}
Updating the Project file
The other thing we will need to do is to update the project file. And that is needed to tell the project on compile to create the comment XML file. And we will do that by adding <PropertyGroup> section to the Swagger.Demo.csproj file.
<propertygroup>
    <generatedocumentationfile>true</generatedocumentationfile>
    <nowarn>$(NoWarn);1591</nowarn>
</propertygroup>
Now once these two configurations are complete, I will run the application again. And this time I will see the expected output in the swagger user interface.
Exploring other documentation elements
This is merely the basic documentation. But we will also need to explain about parameters and other extra information needed to explain the API user.
So, first, let’s start with the input parameters. For that, we will update the CustomerController class’s Get(int id) method. And similar to what we have done previously, I will start with /// comments.
/// <summary>
/// This is the API which will return a customer based on id
/// </summary>
/// <param name="id">Customer Id</param>
/// <returns>A Customer</returns>
[HttpGet("{id}", Name = "Get")]
public string Get(int id)
{
    return "value";
}
As you can notice, apart from <summary> and <param>, I also added <returns> tag. Now let us run the program and observe the swagger user interface output.
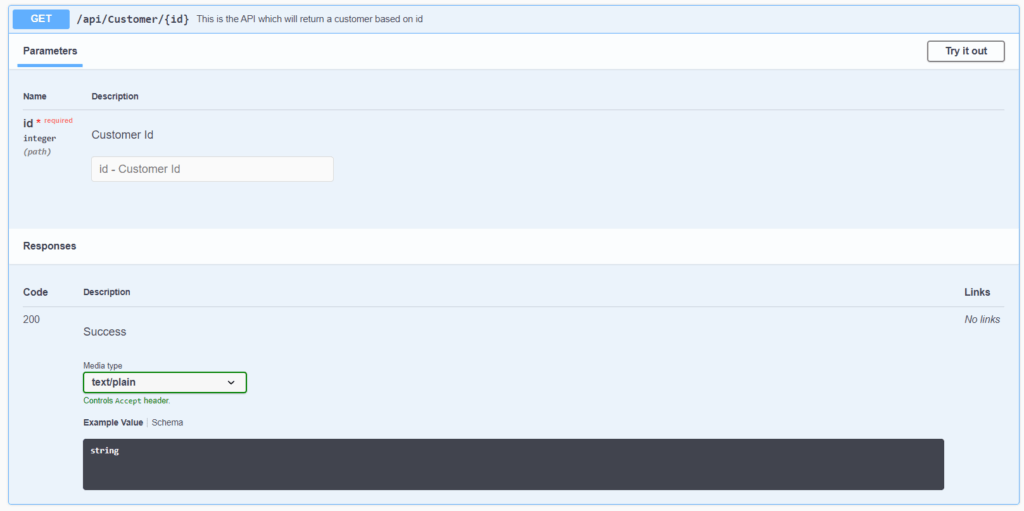
As you can see in the above picture, the summary and parameter comments added are showing up properly. Whereas the comment for return is missing.
Adding return documentation
To add return information to the documentation, we will add <response> tag to our comment. So let up update the Get(int id) method to demonstrate this.
/// <summary>
/// This is the API which will return a customer based on id
/// </summary>
/// <param name="id">Customer Id</param>
/// <response code="200">A valid customer</response>
/// <response code="400">Invalid customer id</response>
/// <returns>A Customer</returns>
[HttpGet("{id}", Name = "Get")]
public string Get(int id)
{
    return "value";
}
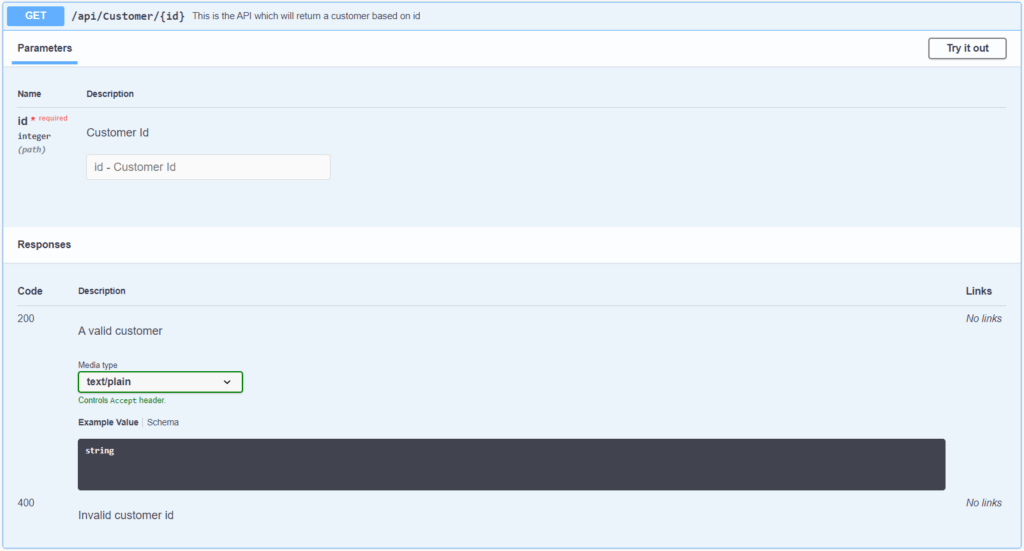
As you can see in the above code, I added two <response> tag. One for HTTP Status Code 200, and the other for HTTP Status Code 400. Tough my code right now just returns a string, but we will change it soon.
Now, if I run the application, I will see both the response show properly in the swagger user interface.
Showing proper JSON in Swagger user interface
For input or output parameters, if we use a complex object, in that case, the swagger user interface will show appropriate JSON in the Example Value section. To demonstrate that, let us create a Customer class.
Firstly, let us return this class from the Get(int id) method.
namespace Swagger.Demo
{
    public class Customer
    {
        public int Id { get; set; }
        public string Name { get; set; }
        public string Address { get; set; }
    }
}
Secondly, let us update the Get(int id) method to incorporate the Customer object.
/// <summary>
/// This is the API which will return a customer based on id
/// </summary>
/// <param name="id">Customer Id</param>
/// <response code="200">A valid customer</response>
/// <response code="400">Invalid customer id</response>
/// <returns>A Customer</returns>
[HttpGet("{id}", Name = "Get")]
public Customer Get(int id)
{
    return new Customer();
}
Finally, if I run the application, I will see the proper JSON structure of the Customer in the swagger user interface.
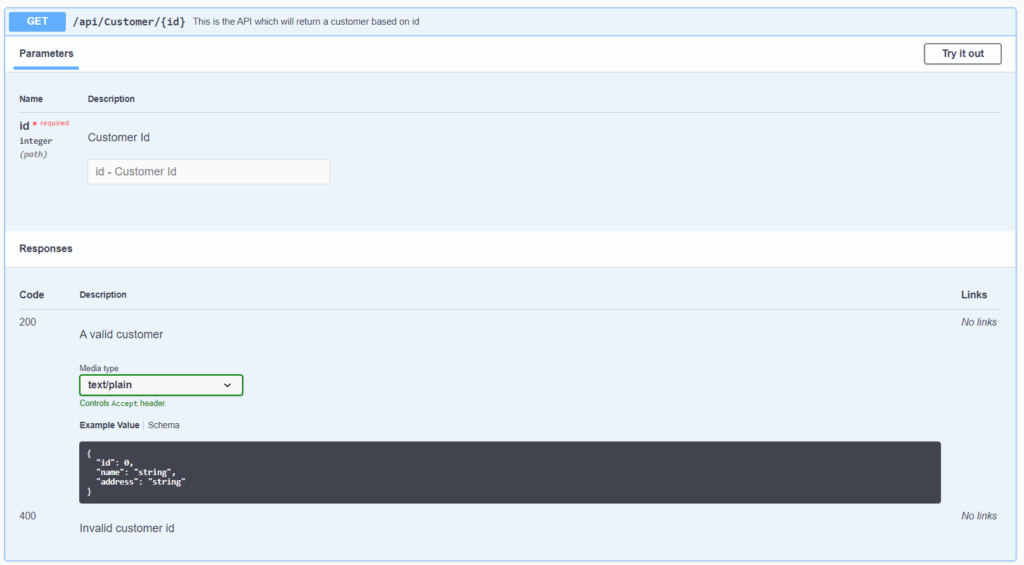
One thing which is odd is that the “Media type” still showing as “text/plain”. We can fix that by adding the attribute Produces to the CustomerController class.
using System.Collections.Generic;
using Microsoft.AspNetCore.Mvc;

namespace Swagger.Demo.Controllers
{
    [Produces("application/json")]
    [Route("api/[controller]")]
    [ApiController]
    public class CustomerController : ControllerBase
    {
        /// <summary>
        /// This is the API which will return a list of customers
        /// </summary>
        /// <returns></returns>
        [HttpGet]
        public IEnumerable<string> Get()
        {
            return new string[] { "value1", "value2" };
        }

        /// <summary>
        /// This is the API which will return a customer based on id
        /// </summary>
        /// <param name="id">Customer Id</param>
        /// <response code="200">A valid customer</response>
        /// <response code="400">Invalid customer id</response>
        /// <returns>A Customer</returns>
        [HttpGet("{id}", Name = "Get")]
        public Customer Get(int id)
        {
            return new Customer();
        }

        // POST: api/Customer
        [HttpPost]
        public void Post([FromBody] string value)
        {
        }

        // PUT: api/Customer/5
        [HttpPut("{id}")]
        public void Put(int id, [FromBody] string value)
        {
        }

        // DELETE: api/ApiWithActions/5
        [HttpDelete("{id}")]
        public void Delete(int id)
        {
        }
    }
}
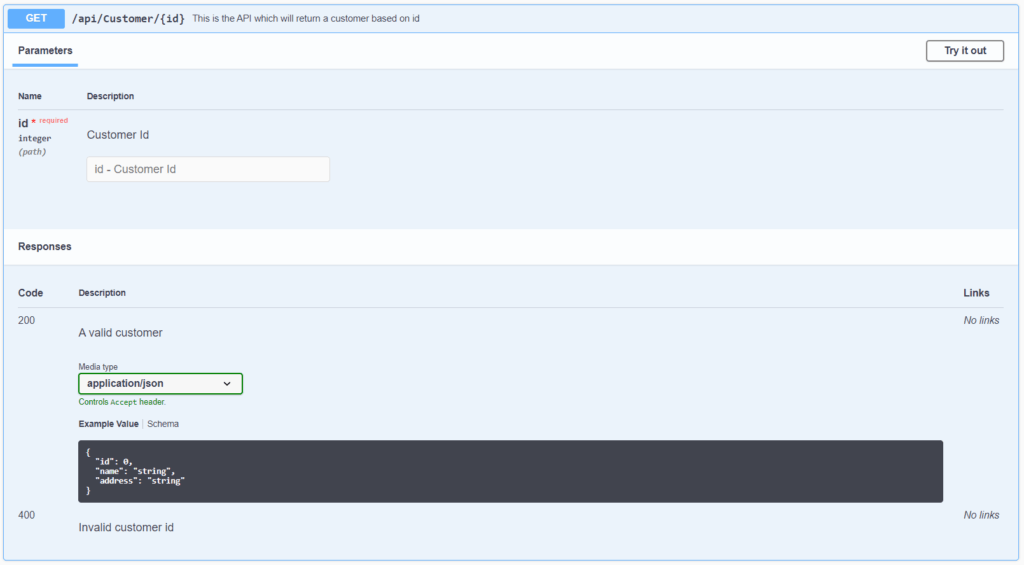
Now, if I run the application, we will see expected media type in the swagger user interface.
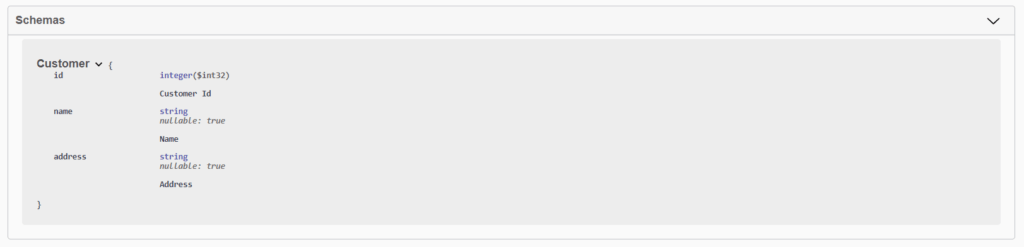
Swagger in ASP.Net Core Model documentation
After we created the Customer object and set it as the return type for Get(int id) method, the side effect of that is now the Customer model is also exposed in the swagger user interface.

This also gives us an opportunity to provide more information about the model. And this can be easily done doing the /// comments for model properties.
namespace Swagger.Demo
{
    public class Customer
    {
        /// <summary>
        /// Customer Id
        /// </summary>
        public int Id { get; set; }
        /// <summary>
        /// Name
        /// </summary>
        public string Name { get; set; }
        /// <summary>
        /// Address
        /// </summary>
        public string Address { get; set; }
    }
}
Firstly, if I run the application, I will see the comments exposed as expected.
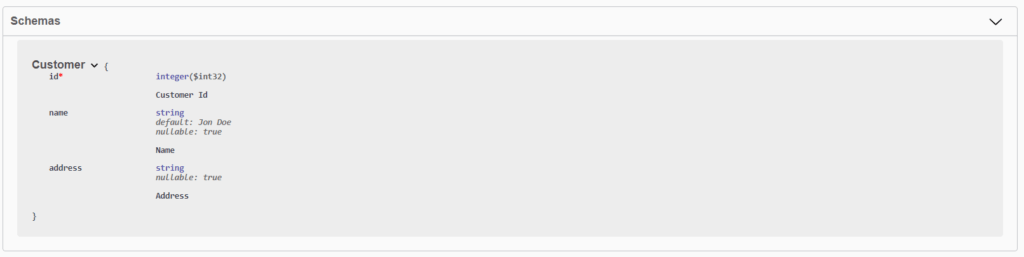
Secondly, let us say for this model we want to show Id as a required field. And Name has a default value. We can achieve that using attributes.
using System.ComponentModel;
using System.ComponentModel.DataAnnotations;

namespace Swagger.Demo
{
    public class Customer
    {
        /// <summary>
        /// Customer Id
        /// </summary>
        [Required]
        public int Id { get; set; }
        /// <summary>
        /// Name
        /// </summary>
        [DefaultValue("Jon Doe")]
        public string Name { get; set; }
        /// <summary>
        /// Address
        /// </summary>
        public string Address { get; set; }
    }
}
Finally, after adding these attributes if I run the application. I will see a red asterisk near Id showing its a required field. And for the Name, we will see a default section.
Miscellaneous documentation
Now there will be situation where we want to provide some extra documentation. Maybe on some usage examples. Or in some cases if the return type is not a typed object, in those cases the structure of return types.
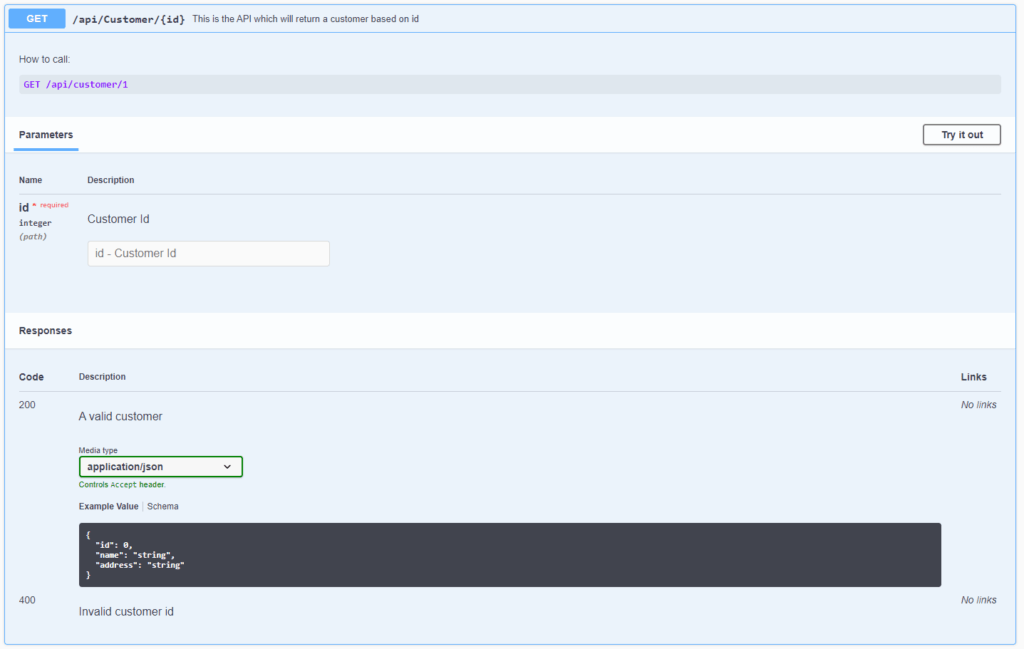
We can do that using the <remarks> tag in the comments section. To demonstrate that, we will update the Get(int id) method. And the remarks will contain how to call this method.
/// <summary>
/// This is the API which will return a customer based on id
/// </summary>
/// <remarks>
/// How to call:
///
///     GET /api/customer/1
///
/// </remarks>
/// <param name="id">Customer Id</param>
/// <response code="200">A valid customer</response>
/// <response code="400">Invalid customer id</response>
/// <returns>A Customer</returns>
[HttpGet("{id}", Name = "Get")]
public Customer Get(int id)
{
    return new Customer();
}
And now if we run the application, we will see the remarks section will show up in a separate section of the swagger user interface.
Conclusion
As you can see Swagger in ASP.Net Core is very powerful for providing API documentation. Using the Swashbuckle.AspNetCore NuGet package this is really easy to achieve.
Swagger in ASP.Net Core solves the issue of code being out of sync from the actual API documentation.
GitHub location for the source code is here.
The YouTube video for this blog post is here.