In this blog post, I am going to cover Migrations in Entity Framework Core. This is the feature, in my opinion, that is extremely necessary for a fast-paced development environment.
In Entity Framework Core, we can use in-line queries or the API provided by the entity framework core for accessing data. The advantage of doing this is that the code deployment becomes really easy.
Why is it so, because the Query and Code resides in the same place and deployed together. Whereas if we use stored procedures, that has to be deployed separately. And most of the time it is cumbersome.
And we always have to be aware of backward compatibility. Since stored procedure and code deployment can never be timed to deploy at the same time. And usually, the practice is to deploy stored procedures before the code.
I am personally not a big fan of stored procedures. Because before we know, the stored procedures become extremely complex, and very hard to test. Since in the name of optimization, the code ends up being in the stored procedure.
In my opinion, the database should be used for just saving and retrieving data, which is what it is good for. Not as an execution engine, since traditional RDBMS database cannot scale horizontally.
Where do Migrations in Entity Framework Core helps?
Well, inline queries and Entity Framework Core API helps with data modification. But when it comes to the data definition, it is the Entity Framework Core Migrations which helps for ease of deployment.
Normally the data definition language scripts execute outside of the code deployment flow. And that makes it harder to manage deployments as well as rollbacks. It needs a lot of co-ordinations and human interventions. Which makes it cost-ineffective and error-prone. In the day of microservices and distributed systems, automation is key for faster and more frequent deployments.
Now there is a workaround for it. For example, scripting all SQL Schema changes and executing that as a part of the start-up of the application. But doing that is cumbersome as well as error-prone.
Migrations in Entity Framework Core does exactly that, but inside of .Net Core language of choice, which is C# in our case. And the Migrations framework of Entity Framework Core provides an extremely easy to use the fluent syntax for the same.
Now, let us get into the implementation details.
Creating an ASP.Net Core Application
First of all, I am going to create a new ASP.Net Core Web Application, using Visual Studio 2019.
- Firstly, I am going to click on the File menu, and then select New -> Project.
- Secondly, in the new project window popup, I will select ASP.NET Core Web Application. And then click on the Next button.
- Thirdly, on the next page of the pop-up, I will provide the name of the project in the Project Name field as EFCoreMigration.Demo. And then click on the Create button.
- Finally, on the final page, I will select the API template option. And I will keep other values default (ASP.Net Core 3.1) and click on the Create button.
Installing the necessary NuGet packages
Once the project is ready, I will install the following NuGet packages necessary for implementing Migrations in Entity Framework Core. For the database, I will use SQL Server Express Edition.
- Microsoft.EntityFrameworkCore – For basic Entity Framework Core features
- Microsoft.EntityFrameworkCore.SqlServer – For SQL Server support
- Microsoft.EntityFrameworkCore.Tools – For providing necessary API for Migrations
Creating a Table through Migrations in Entity Framework Core
Now that all the installation of all the NuGet packages that are necessary for Migrations are complete, it is time to start writing code for Migrations.
But before we write the migrations scripts, it is necessary to establish the database context. And the data entity necessary for accessing the data.
For this example, let us consider that we have an Employee table, which represents the data of every employee inside of an organization. We will represent the Employee data model through the Employee class as shown below.
Creating the DbContext
The Employee class will have an Id of the employee. The first name, last name, and address.
namespace EFCoreMigration.Demo
{
    public class Employee
    {
        public int Id { get; set; }
        public string FirstName { get; set; }
        public string LastName { get; set; }
        public string Address { get; set; }
    }
}
Once the Employee class is ready, I will create a new class EmployeeContext, which will derive from the DbContext base class of Entity Framework Core. The EmployeeContext class will be the database gateway, and it will expose a property Employees for exposing the Employees table.
The constructor of the ExployeeContext class will take an instance of DbContextOptions. We will use the DbContextOptions instance to configure which database to use. And we will set the instance of DbContextOptions in the Startup class while configuring the dependency injection container.
We will use the DbContext base classes constructor overload to pass the instance of the DbContextOptions.
using Microsoft.EntityFrameworkCore;

namespace EFCoreMigration.Demo
{
    public class EmployeeContext : DbContext
    {
        public EmployeeContext(DbContextOptions dbContextOptions)
            : base(dbContextOptions)
        {
        }

        public DbSet<Employee> Employees { get; set; }
    }
}
Setting up Startup class
Once the Employee and EmployeeContext classes are ready, it is time to configure both in the dependency injection container. And for that, I will update the Startup class.
For adding the ExployeeContext to the dependency injection container, I will change the ConfigureServices method of the Startup class.
Firstly, I will use the extension method AddDbContext on the IServiceCollection instance to add EmployeeContext.
public void ConfigureServices(IServiceCollection services)
{
    services.AddControllers();
    services.AddDbContext<EmployeeContext>(
        ob => ob.UseSqlServer(Configuration["Connection"],
            sso => sso.MigrationsAssembly(
                Assembly.GetExecutingAssembly().GetName().Name)
        ));
}
Secondly, I will set up the AddDbContext method by providing the implementation for the Action delegate which takes DbContextOptionsBuilder instance.
Finally, I will call the extension method UseSqlServer on the DbContextOptionsBuilder instance. And I will pass the connection string to the database as the first parameter. As the second parameter, I will pass another Action delegate which gives SqlServerDbContextOptionsBuilder instance.
I will use the SqlServerDbContextOptionsBuilder instance to configure the migration assembly, which will be used by the Migrations framework. In this case, it will be the executing assembly.
Using EmployeeContext in API
Now that EmployeeContext is ready and configuration inside of the dependency injection is complete, I will create an API to use it.
I will create a new API Controller and name it as EmployeeController. In the constructor of the EmployeeController, I will accept EmployeeContext as an input.
EmployeeContext for providing Get and Create method. But here for interest of time I will use EmployeeContext directly in the controller.I will keep only one Get and one Post method inside of the EmployeeController. The Get method will return all employees from the database. And the Post method will create a new employee in the database.
using System.Collections.Generic;
using Microsoft.AspNetCore.Mvc;

namespace EFCoreMigration.Demo.Controllers
{
    [Route("api/[controller]")]
    [ApiController]
    public class EmployeeController : ControllerBase
    {
        private readonly EmployeeContext employeeContext;

        public EmployeeController(EmployeeContext employeeContext)
        {
            this.employeeContext = employeeContext;
        }

        // GET: api/Employee
        [HttpGet]
        public IEnumerable<Employee> Get()
        {
            return employeeContext.Employees;
        }

        // POST: api/Employee
        [HttpPost]
        public void Post([FromBody] Employee employee)
        {
            employeeContext.Add(employee);
            employeeContext.SaveChanges();
        }
    }
}
Once the controller is ready I will run the application. But since the database is not ready yet, I will get an error when I access /api/employee.

Creating Migrations class
Now, for creating the new database and table, I will use Migrations.
For the Migrations class, I will create a new Folder named Migrations. Inside the folder I will create a new file 02052020101000_Migration1.cs. But I will provide the class name as Migration1.
I will derive this class from Migration base class available in the Microsoft.EntityFrameworkCore.Migrations namespace.
I will override the abstract method Up as well as the virtual method Down.
Inside the Up method, I will use the MigrationBuilder instance to create the Employees table. And inside the Down method, I will use MigrationBuilder instance to drop the table.
Inside the CreateTable method, for columns I will return an anonymous type. This anonymous type will represent all the columns in the table.
Apart from the Up and Down methods, there are couple of very important attributes, which are added to the class.
The first one is Migration, which takes an id, which is the unique identifier for a migration. The Migration framework identifies which class to execute from this attribute.
And the second attribute is DbContext, which specifies the database context against which to run the migration.
using Microsoft.EntityFrameworkCore.Infrastructure;
using Microsoft.EntityFrameworkCore.Migrations;
using System.Diagnostics.CodeAnalysis;

namespace EFCoreMigration.Demo.Migrations
{
    [DbContext(typeof(EmployeeContext))]
    [Migration("02052020101000_Migration1")]
    public class Migration1 : Migration
    {
        protected override void Up(
            [NotNullAttribute] MigrationBuilder migrationBuilder)
        {
            migrationBuilder.CreateTable(
                name: "Employees",
                columns: cb => new
                {
                    Id = cb.Column<int>(nullable: false)
                            .Annotation("SqlServer:Identity", "1, 1"),
                    FirstName = cb.Column<string>(nullable: false),
                    LastName = cb.Column<string>(nullable: false),
                    Address = cb.Column<string>(nullable: true)
                },
                constraints: ctb => ctb.PrimaryKey("PK_EmployeeID_Key", x => x.Id)
                );
        }

        protected override void Down(MigrationBuilder migrationBuilder)
        {
            migrationBuilder.DropTable("Employees");
        }
    }
}
Update Setup with Migration
Once the migration class is ready it is time to update the Startup class to call Migrate method for migrations.
Inside the Startup class, I will update the Configure method to accept IServiceProvider as the third parameter. And inside of the Configure method, I will get an instance of the ExployeeContext class. And call Database.Migrate on the ExployeeContext instance.
public void Configure(
            IApplicationBuilder app,
            IWebHostEnvironment env,
            IServiceProvider serviceProvider)
{
    if (env.IsDevelopment())
    {
        app.UseDeveloperExceptionPage();
    }

    app.UseHttpsRedirection();

    app.UseRouting();

    app.UseAuthorization();

    app.UseEndpoints(endpoints =>
    {
        endpoints.MapControllers();
    });

    serviceProvider.GetService<EmployeeContext>()
        .Database.Migrate();
}
Now if I run the application. The Migrate method will create the database if it is not already available, and then it will run all the migration classes. As a result, the EFDemo database will create and the table Exployees.
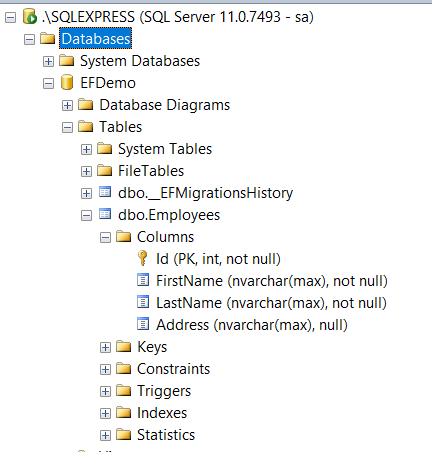
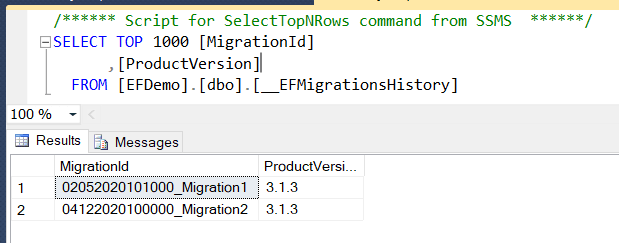
Apart from the Employees table, there is another table __EFMigrationsHistory. The Migrations framework manages this table. This table keeps the history of all the migrations that are executed in this database.
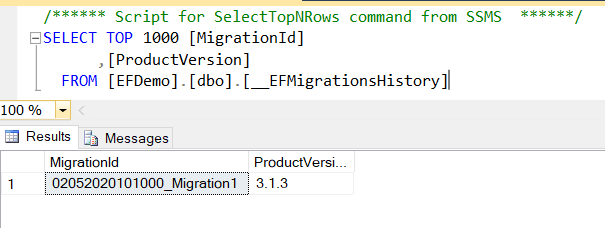
If I run a select query in the table, I will see that the migration script with the id 02052020101000_Migration1 in the Migration attribute of Migration1 class is available in this table.
Now if I navigate to /api/employee, I will not get any error, just an empty JSON array response. Since I do not have any data in the database.
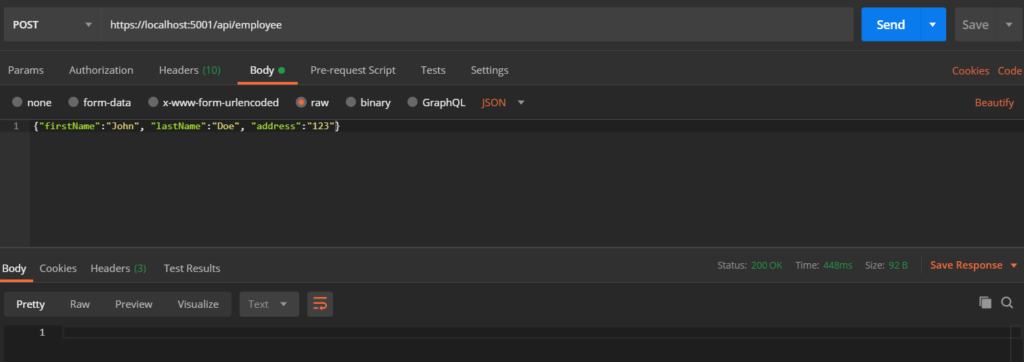
Adding data using Postman
Now I will run a Postman script to add an Employee into the database.
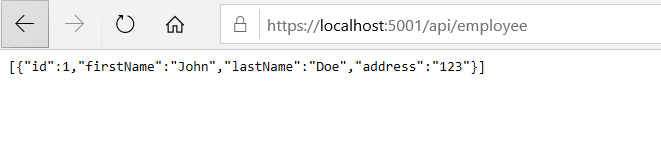
Now if I again go to /api/employee, I will see the response.
New Column to the table
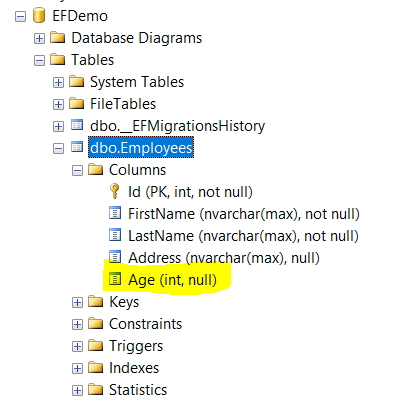
To add a new column to the table, first, let us update the Employee class. Let us say we want to add a new field Age. For that, I will add a new nullable integer property to the Employee class. Nullable, since for older records this value will be null.
namespace EFCoreMigration.Demo
{
    public class Employee
    {
        public int Id { get; set; }
        public string FirstName { get; set; }
        public string LastName { get; set; }
        public string Address { get; set; }
        public int? Age { get; set; }
    }
}
Once the new property is ready in the Employee class, I will create a new Migration class for creating the new column in the Employees table. I will name the new migration class file as 04122020100000_Migration2.cs and the class name as Migration2.
I will derive this class from Migration as before. But this time inside of the Up method, I will call AddColumn on the MigrationBuilder instance to add the new Age column.
But since we are adding a new column, for existing records, this column will have a null value. In certain scenarios, it might be necessary to provide default values to the existing records.
We can use Sql extension method on the MigrationBuilder instance to achieve this. We can execute any data migration script inside this method. Here we will use an Update SQL statement to add a default value for Age to all the existing records.
And finally, inside of the Down method, I will call DropColumn on the MigrationBuilder instance. This will drop the column during rollback.
using Microsoft.EntityFrameworkCore.Infrastructure;
using Microsoft.EntityFrameworkCore.Migrations;
using System.Diagnostics.CodeAnalysis;

namespace EFCoreMigration.Demo.Migrations
{
    [DbContext(typeof(EmployeeContext))]
    [Migration("04122020100000_Migration2")]
    public class Migration2 : Migration
    {
        protected override void Up([NotNullAttribute] MigrationBuilder migrationBuilder)
        {
            migrationBuilder.AddColumn<int>("Age", "Employees", nullable: true);

            migrationBuilder.Sql("UPDATE Employees SET Age = 30");
        }

        protected override void Down(MigrationBuilder migrationBuilder)
        {
            migrationBuilder.DropColumn("Age", "Employees");
        }
    }
}
Now if we run the application, we will see the new column in the Employees table.
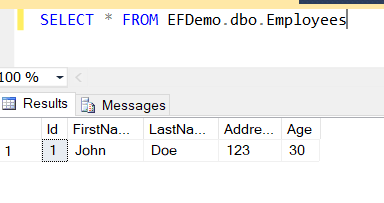
If I run a select query, I can see the default value of 30 is available to the existing record in the database.
Now if I run a Select on the __EFMigrationsHistory table, I will see two records as expected.
Rolling back to a migration version
Now let us say, during testing we figured out some issue with the release. And we want to rollback the changes to previous version.
Which is the migration version 02052020101000_Migration1. Now question how to pass it to the Migrate method. The Migrate method on the Database does not take any parameter.
Hence, we will change the implementation of how we call the Migrate call inside of the Configure method of Startup class. Instead of Database.Migrate, we will first get an insance of IMigrator from Database.GetService call. After that I will call Migrate on the IMigrator instance. This method takes target migration name as an optional parameter.
For the name of the Migration class, I will get it from the appsettings.json file. Hence I will add a new item Migrations in the appsettings.json, which will have a value of Migration1. This is the migration version we will downgrade to.
The reason we will keep this value in configuration, because this will ensure for every version of the software build, we can have different migration value here.
{
  "Logging": {
    "LogLevel": {
      "Default": "Information",
      "Microsoft": "Warning",
      "Microsoft.Hosting.Lifetime": "Information"
    }
  },
  "AllowedHosts": "*",
  "Migration": "Migration1",
  "Connection": "Persist Security Info = False; Integrated Security = true; Initial Catalog = EFDemo; server = .\\SQLEXPRESS"
}
public void Configure(
            IApplicationBuilder app,
            IWebHostEnvironment env,
            IServiceProvider serviceProvider)
{
    if (env.IsDevelopment())
    {
        app.UseDeveloperExceptionPage();
    }

    app.UseHttpsRedirection();

    app.UseRouting();

    app.UseAuthorization();

    app.UseEndpoints(endpoints =>
        {
            endpoints.MapControllers();
        });

    serviceProvider.GetService<EmployeeContext>()
        .Database.GetService<IMigrator>()
            .Migrate(Configuration.GetValue<string>("Migration"));
}
Now, if I run the application, the migration will drop the column Age from the Employees table. This will happen because when we downgrade to previous migration value, the migration framework will call Down method of the class which is being removed.
Now if I check the database, I will see the Age column is removed. And if I run the select query in the __EFMigrationsHistory table, I will see only one record with id 02052020101000_Migration1.
Conclusion
Migrations in Entity Framework Core is really easy and convenient. The fluent API makes the data definition (DDL) code both understandable as well as maintainable. In an environment where fast deployment, as well as rollback, is key to success, the Migrations implementation is a must.
The source code of the solution is available in my GitHub repository here.
And my recorded video is available in YouTube in two parts here: Part1 and Part2.