Using a caching solution becomes important when we are building a high performant web-based application or micro-services system. I wrote about using Memcached as a distributed caching solution in my previous blog. In today’s blog, I am going to take a deep dive into Redis Cache as a distributed in-memory caching solution for .Net Core. During the implementation, I will run both Redis Cache and .Net Core Web API applications in their individual docker containers.
In this blog, I am going to cover the following high-level topics:
- What is Redis Cache
- Key features provided by Redis Cache
- Installing Redis Cache in a Docker container
- Using Caching Redis in .Net Core Web API
- My takeaways on Redis Cache
What is Redis Cache
Redis is an open-source distributed in-memory data store. We can use it as a distributed (no-SQL) database or as a distributed in-memory cache or a pub/sub messaging engine, and more recently streaming engine. The most popular use case I have encountered so far, is using it as a distributed in-memory caching engine. Hence in this blog, I will implement using the caching feature of Redis in .Net Core application.
First, let’s talk about the different data structures Redis supports. Unlike Memcached, Redis supports multiple data structures:
- Strings – a simple string as a value
- Hashes – a key-value pair as a value
- Lists – a list of items
- Sets – an unordered collection of string
- Sorted sets – kind of a sorted set. But there is more to it, you can find more information here. I have not found any use of it yet in my day to day problems, hence leaving it alone.
Apart from the above-defined data structures, it also supports complex data structures like bitmaps, hyperloglogs, and geospatial indexes. And last but not least streams. In a day to day scenario, we will use mostly strings and hashes and maybe sets. Others are very specific cases which would have a very niche use-case, except for stream of course. I will discuss streams in details later. I have not used anything beyond string and hashes so far.
Redis provides a command-line interface. We can use the redis-cli for running any commands. It is a very handy tool to verify if the installation went all. Also, it can help debug issues which sometimes might be hard to debug through client APIs.
Key features provided by Redis Cache
The main feature of Redis is a distributed in-memory key/value data store. But there are few advanced features, which makes it suitable for more than just a key/value store. So let’s get into details on each of the key features.
Support for transactions
It supports transactions through five commands.
- DISCARD
- EXEC
- MULTI
- UNWATCH
- WATCH
Using the above command sets, we can achieve atomic transactions across multiple records. Meaning a group of commands can execute as a single execution step or unit. This guarantees that:
- Firstly, all the commands part of a transaction will execute in sequence. And unless the transaction is complete, the records which are part of this transaction cannot be modified by another parallel command.
- Secondly, either all the commands are processes successfully, or none of them will be processed at all.
This feature somewhat makes it a candidate for a persistent data store with the ability to create a relational data structure and keep them in sync. As well as update the relational records under a single atomic transaction. Hence I can see examples where applications use it as a database. But even without transactions, we can use it as a no-SQL database. But I will personally never use it as a database, just because it supports transaction. I will use it where its best and that’s its caching functionality.
Pub/Sub Engine
We can use Redis as a Pub/Sub engine as well. The following commands allow it to be a Pub/Sub engine.
- PSUBSCRIBE
- PUBLISH
- PUBSUB
- PUNSUBSCRIBE
- SUBSCRIBE
- UNSUBSCRIBE
Redis implements the publish/subscribe paradigm through PUBLISH, SUBSCRIBE and UNSUBSCRIBE commands. The Pub/Sub in Redis is topic-based, where multiple subscribers can subscribe to a single topic or many topics. The relationship between subscribers and the topic is many to many. The topic is named channel in Redis, but conceptually it’s the same as a topic in other Pub/Sub echo systems like RabbitMQ. And on the other side, any publisher can publish a message to any topic/channel.
Redis also supports pattern matching subscriptions. Pattern matching subscribe and unsubscribe is done through commands PSUBSCRIBE and PUNSUBSCRIBE.
Stream
Streams in Redis are first released in version 5. The streams in Redis is similar to Kafka. You can check out my blog on Kafka and .Net Core here. Multiple consumers can read the same stream at a different point in time. Whereas producers will continuously produce data into the stream. It also has a concept of consumer groups like Kafka, where different consumers from a consumer group can read different parts of the stream.
Streams in Redis is an afterthought and introduced much later in the product. I personally will use Kafka instead if I need to use stream. But if someone is using in Redis echo system already for Caching and Database, it might make sense for them to use the Redis stream instead.
Installing Redis Cache in a Docker container
We can install Redis in a Windows, Mac or a Linux PC. We can install directly or inside a docker container. I prefer Docker containers, as it can keep things isolated and also it’s easy to replicate and manage for production environments.
To install a Docker image of the Redis, we will need to pull the image from DockerHub.
docker pull redis
Once the image is pulled down, we can view it using docker images command. Once we confirm the docker image is successfully installed we will start the container. For starting the container we will use the following command.
docker run --name local-redis -p 6379:6379 -d redis
The above command will create a new container named local-redis and will expose port 6379 of the local machine to the 6379 port of the container, where Redis is running.
Once the container starts, we can check it using the command docker logs -f local-redis.

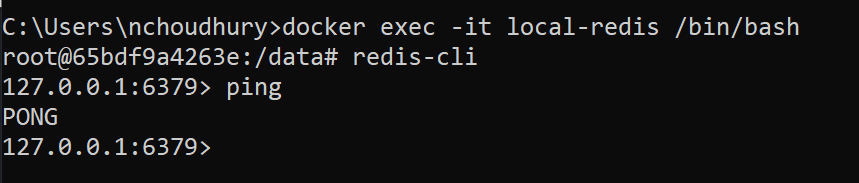
Now to validate if the installation is working as expected, we will run redis-cli. For that firstly, I will bash inside the container and run the redis-cli with the following commands.
docker exec -it local-redis /bin/bash
This command will get us inside of the docker container for Redis. Once we are inside, we can just fire redis-cli, which will open the command-line interface. Finally, we can send a ping to the CLI, and if everything is working, we will get a PONG response, indicating that the Redis is running properly.
Using Caching Redis in .Net Core Web API
Firstly, I will create a new .Net Core Web API application. I will use .Net Core 3.0 and enable the Docker container for the application. I will not enable HTTPS, but you can certainly do it.


Once we create the new project, we will add nuget packages needed for Redis client. There are a few options available out there. I will select StackExchange.Redis, just because it has the highest number of downloads, 22.6M from Nuget repository as of the day of this blog post. I will use the latest available version, during the time of the blog it is 2.0.601.

Startup class changes
Once we install the nuget package, it is now time to update the project to start using Redis Cache. Firstly, I will update the Startup class to register the Redis client to the dependency injection container. For achieving we will add the following lines in the existing code, inside of ConfigureServices method.
IConnectionMultiplexer redis = ConnectionMultiplexer.Connect("10.0.75.1");
services.AddScoped(s => redis.GetDatabase());
In the above code, I am first connecting to the Redis instance running in the container using the ConnectionMultiplexer.Connect method and passing the IP Address of the docker sub-system. This is a very important point to note, if the ASP.Net Web API is running inside of a Docker container, then we need to pass the Docker sub-system IP (I will show how to get it using IPConfig command). But if the Web API is running on local PC, we can just pass localhost instead.
Once the Redis instance is available, I will use the GetDatabase to get the default database instance, which I will access inside of the controller class for creating the cache.
To get the docker sub-system IP, run IPConfig in command prompt and find the IP as in the below picture.

The complete Startup class code is below.
using Microsoft.AspNetCore.Builder;
using Microsoft.AspNetCore.Hosting;
using Microsoft.Extensions.Configuration;
using Microsoft.Extensions.DependencyInjection;
using Microsoft.Extensions.Hosting;
using StackExchange.Redis;

namespace redis_demo
{
    public class Startup
    {
        public Startup(IConfiguration configuration)
        {
            Configuration = configuration;
        }

        public IConfiguration Configuration { get; }

        // This method gets called by the runtime. Use this method to add services to the container.
        public void ConfigureServices(IServiceCollection services)
        {
            services.AddControllers();
            // Connect to docker IP
            IConnectionMultiplexer redis = ConnectionMultiplexer.Connect("10.0.75.1");
            services.AddScoped(s => redis.GetDatabase());
        }

        // This method gets called by the runtime. Use this method to configure the HTTP request pipeline.
        public void Configure(IApplicationBuilder app, IWebHostEnvironment env)
        {
            if (env.IsDevelopment())
            {
                app.UseDeveloperExceptionPage();
            }

            app.UseRouting();

            app.UseAuthorization();

            app.UseEndpoints(endpoints =>
            {
                endpoints.MapControllers();
            });
        }
    }
}
New Cache Controller
Next, I will create a new controller class to access Redis cache for creating and retrieving cached values. I will name the controller as CacheController.

Inside of the controller I will create a new constructor and add IDatabase interface of the StackExchange.Redis namespace. I registered the instance of the IDatabase earlier in the Startup class.
The instance of IDatabase will allow us to add and get a cache from Redis.
Next, I will update the Get and Post HTTP methods to get and add cache to the Redis cache.
using System.Collections.Generic;
using System.Text;
using Microsoft.AspNetCore.Mvc;
using StackExchange.Redis;

namespace redis_demo.Controllers
{
    [Route("api/[controller]")]
    [ApiController]
    public class CacheController : ControllerBase
    {
        private readonly IDatabase _database;

        public CacheController(IDatabase database)
        {
            _database = database;
        }

        // GET: api/Cache?key=key
        [HttpGet]
        public string Get([FromQuery]string key)
        {
            return _database.StringGet(key);
        }

        // POST: api/Cache
        [HttpPost]
        public void Post([FromBody] KeyValuePair<string,string> keyValue)
        {
            _database.StringSet(keyValue.Key, keyValue.Value);
        }
    }
}
In the above code, I will use method StringSet of IDatabase to save a value into the cache and StringGet of IDatabase to get the value back. If we want to set an expiry for the cache, we can use the optional TimeSpan parameter expiry of the StringSet method to whatever time we want. Apart from that, if we need to define when to set the value, we can use the optional when parameter, which takes a When enum.
Running the application
When I run the application inside the docker container, I can first make a POST call to the CacheController and set a cache value “Welcome to Redis” with a key “welcome” using PostMan.

Now, I will run the redis-cli to get the value from Redis cache and confirm it was saved properly.
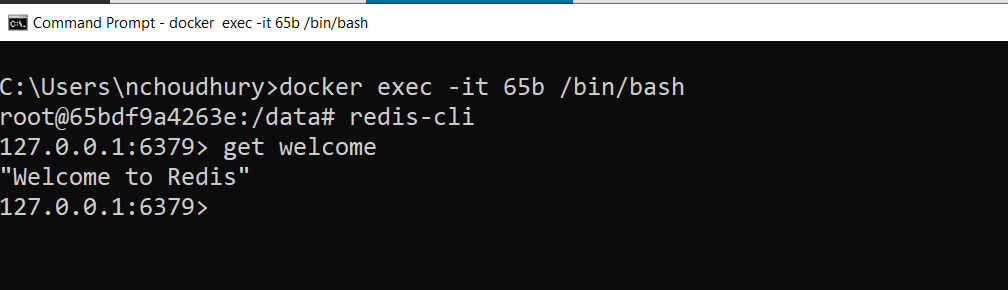
Finally, I will call the Get method of the CacheController using Postman, which will test the IDatabase.StringGet method to ensure it is also returning the expected value.

My takeaways on Redis Cache
In conclusion, using Redis is very simple and straightforward. The redis-cli is very easy to use. The StackExchange.Redis nuget package is also very simple. As far as an in-memory distributed cache is concerned, its a very good tool. I am not user I will ever use it anything beyond just a caching platform. I am not sold into using it as a Pub/Sub engine or even a stream. But this is just my personal preference, since I use other product for these features.
Compared to a Memcached, when it comes to caching, I do not find a lot of differences, apart from different in-built data structure supported for caching. If we are talking about keeping simple string-based values in a cache, I do not see any advantage of going with Redis over Memcached or vice-versa.
One other data structure which is worth mentioning is the support for geospatial data types in Redis. It has a comprehensive set of API’s to work with geospatial data. Hence, if we are dealing with Map data, Redis is going to be an obvious choice.
YouTube video of the code walkthrough is: https://youtu.be/qYBaMFHeom8