Hello everyone and welcome to .Net Core Central. In this blog, I am going to walk through the AWS serverless feature and that is AWS SQS (Simple Queue Service).
In this blog post, I am going to
- Firstly, I will explain what is SQS and its advantage.
- Secondly, I am going to go share how to create an SQS queue using AWS management console.
- Finally, I am going to use C# to create a lambda function, which will be connected to the SQS queue to receive message and just print it out.
What is AWS SQS
First, let us discuss what is AWS SQS.
AWS SQS or simple queue service is a fully managed serverless queueing service provided by AWS.
SQS provides two types of message queues:
- First type is a standard queue
- And the second type is a FIFO
The standard queue provides best-effort ordering. Meaning it is not guaranteed that the messages will be delivered in the same order in which they were entered. But it will do its best effort to ensure that and at least one message is delivered with the maximum throughput.
This means there might be a situation where you might get the same message multiple times.
And for FIFO, as the name suggests it is first in and first out queue. And it guarantees the order of the message.
Advantages of using SQS
Next, let us find out what are the advantages of using SQS.
- So the fast advantage of course just like any other serverless feature, there is no administrative overhead as AWS manages everything.
- The second advantage of SQS is that it provides out-of-box server-side encryption, should we need to secure communication across different services.
- And then thirdly, SQS automatically scales out based on the demand.
- Finally, SQS provides a reliable delivery of messages irrespective of the load.
So these four are very critical and are the key advantages of using SQS.
Create a new SQS queue
Now let us use the AWS console and create a queue. So just like any other feature, we can type SQS on the top search bar, and it is going to end up showing the Simple Queue Service.
Once we select that, we will be presented with the default dashboard of SQS. And we can expand the sidebar and selects the Queues option to go to the existing queues.
There I can click the button “Create Queue” to create a new Queue.

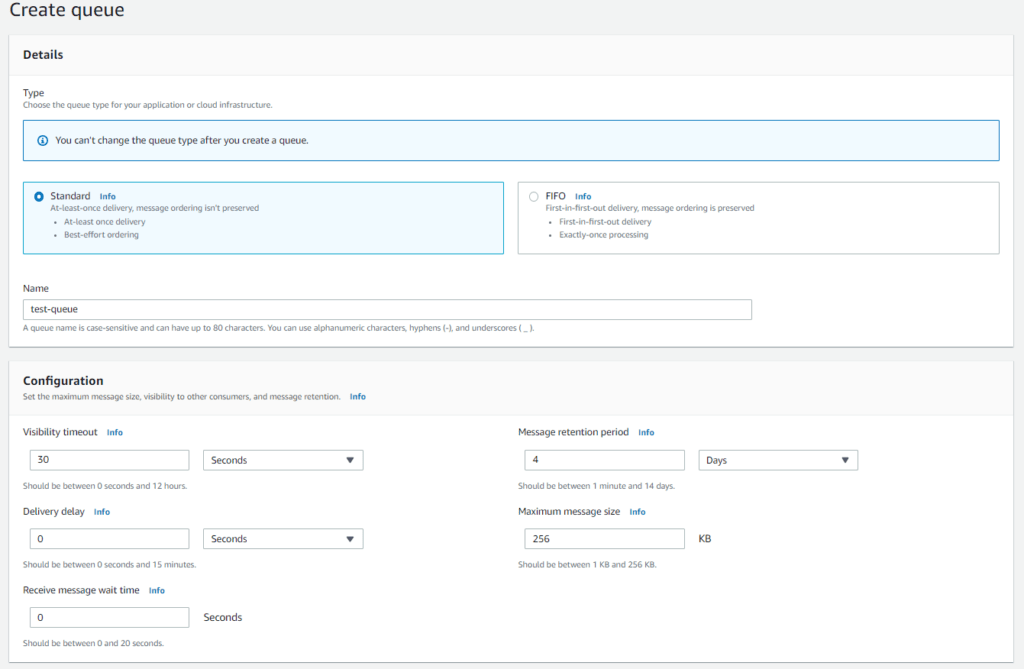
In the create queue page, we have two options to select from one is standard and the other is FIFO. I am going to go with the default standard. The reason for that is FIFO is more expensive compared to standard because it guarantees message ordering.
I will give the name of the queue as test-queue.
Configurations
In the configuration section, there are a few configurations that we can set. The configurations that will come in handy are:
- Delivery delay: if you want to delay the message to be delivered to the consumer and it is 0 seconds to 15 minutes
- Receive message wait time: it is the maximum amount of time that polling will wait for message to become available to receive
- Message retention period: it is how many days or hours or minutes the message has to be retained. For our example here I am just going to keep it as one hour.
- Maximum message size: it is the maximum size of the message by default is set to 256 kb. The range is between 1 kb to 256 kb.
- Visibility timeout: it sets the length of time that a message received from a queue by one consumer will not be visible to other message consumers.
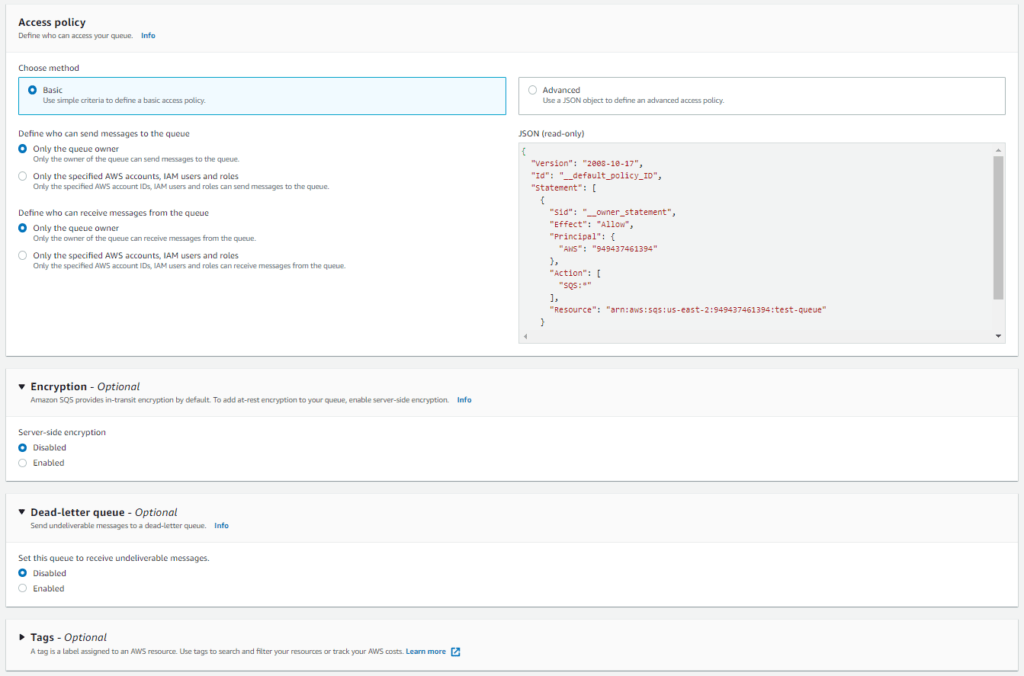
- Encryption: if enables, this option will enable server side encryption of messages in the queue.
- Dead letter queue: is another feature where if messages are undelivered they will be sent to that letter queue.
- Tags: just like every other AWS services, we can use tags to identify an application.
Now when it comes to SQS, just like any other serverless feature, we will use HTTP to get the message from the queue. And we will implement polling. Though if we are using serverless features like lambda with SQS we don’t have to do any polling of messages.


Message size limitation
The message size limitation of 256 KB is very critical to keep in mind. Because if you have a message size bigger than 256 KB, then you have a couple of options:
- The first option is not to use SQS and use some other queueing engine like RabbitMQ. But if you use RabbitMQ, then you will have to worry about managing capacity and other aspects.
- The second option is to keep the message payload saved in S3 which is a distributed file system in AWS. And then you can keep the reference to the S3 payload in your message. So that way you will never go beyond 256 kb.
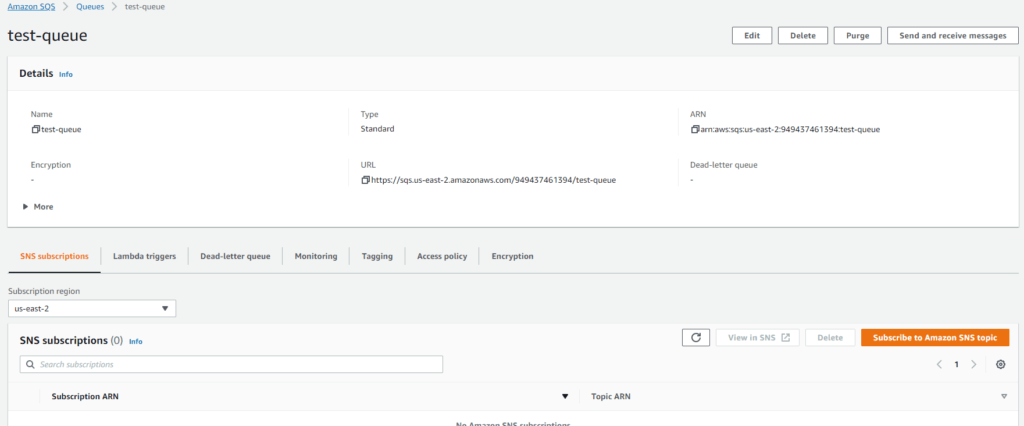
After the queue is created, there is an option called Lambda Triggers, and this is where we will configure our lambda to be triggered when a message is sent to this queue.

New Lambda function
For creating a new lambda function I am going to use the .NET CLI. And I am going to use AWS templates to generate the code.
And I am going to use the following command:
dotnet new lambda.sqs
In the above command lambda.sqs is the template that I am going to use. And in my previous blog post about Lambda, I discussed how to use a template. If you have not read the blog, I will strongly suggest you do that first.
I will give the name of the application as SQS.Demo. Next, I am going to open Visual Studio 2019 and open this particular project.
Inside the folder created by the lambda template, by default source and test, two folders are created. The source folder contains the source code and the test folder contains the test for the particular lambda.
The default function
The project comes with a default function.
using System.Threading.Tasks;
using Amazon.Lambda.Core;
using Amazon.Lambda.SQSEvents;


// Assembly attribute to enable the Lambda function's JSON input to be converted into a .NET class.
[assembly: LambdaSerializer(typeof(Amazon.Lambda.Serialization.SystemTextJson.DefaultLambdaJsonSerializer))]
namespace SQSDemo
{
    public class Function
    {
        /// <summary>
        /// Default constructor. This constructor is used by Lambda to construct the instance. When invoked in a Lambda environment
        /// the AWS credentials will come from the IAM role associated with the function and the AWS region will be set to the
        /// region the Lambda function is executed in.
        /// </summary>
        public Function()
        {
        }

        /// <summary>
        /// This method is called for every Lambda invocation. This method takes in an SQS event object and can be used
        /// to respond to SQS messages.
        /// </summary>
        /// <param name="evnt"></param>
        /// <param name="context"></param>
        /// <returns></returns>
        public async Task FunctionHandler(SQSEvent evnt, ILambdaContext context)
        {
            foreach(var message in evnt.Records)
            {
                await ProcessMessageAsync(message, context);
            }
        }

        private async Task ProcessMessageAsync(SQSEvent.SQSMessage message, ILambdaContext context)
        {
            context.Logger.LogLine($"Processed message {message.Body}");

            // TODO: Do interesting work based on the new message
            await Task.CompletedTask;
        }
    }
}
In the above function, the FunctionHandler method takes an object of SQSEvent and ILambdaContext. And then for every record which comes from the SQSEvent, it is just calling ProcessMessageAsync which is a private function.
In the ProcessMessageAsync method, it is just logging the incoming message body using the ILambdaContext logger. Which will log the message into AWS Cloudwatch.
Nuget packages
Now the NuGet package that is installed automatically are as follows:
- Amazon.Lambda.Core
- Amazon.Lambda.Serialization.SystemTextJson
- Amazon.Lambda.SQSEvents
Deploying the function
Next, I will build this project, and then I will deploy this lambda function in AWS.
For that I am going to go into the SQSDemo folder path and then here I am going to run the following command:
dotnet lambda deploy function SQSTestFunction
One important thing to remember, in the aws-lambda-tools-defaults.json file I will specify my AWS profile and the region for deployment.
{
  "Information": [
    "This file provides default values for the deployment wizard inside Visual Studio and the AWS Lambda commands added to the .NET Core CLI.",
    "To learn more about the Lambda commands with the .NET Core CLI execute the following command at the command line in the project root directory.",
    "dotnet lambda help",
    "All the command line options for the Lambda command can be specified in this file."
  ],
  "profile": "personal",
  "region": "us-east-2",
  "configuration": "Release",
  "framework": "netcoreapp3.1",
  "function-runtime": "dotnetcore3.1",
  "function-memory-size": 256,
  "function-timeout": 30,
  "function-handler": "SQSDemo::SQSDemo.Function::FunctionHandler"
}
When I execute this command, the CLI will prompt me to select the role and I am going to go ahead and select the lambda-demo role.
NOTE: I wrote about this role as a part of my Lambda blog post.
Configure SQS to trigger lambda
Now the new lambda function is ready. Now I can configure the SQS queue to trigger this new lambda function when a new message is available in the SQS queue.
And for that, I am going to click on Configure Lambda Function trigger button. And in the configuration page, I will select the newly created lambda from the available lambda functions dropdown.

Test
Once we send a message to this particular queue it will trigger the lambda and this lambda should be able to print the message.
Firstly I will click on the Send and receive messages button on the SQS queue detail page. And finally, in the Send message section, I will type in a test message in the Message body text box and click on the Send message button.

After the message is sent I will check the log in AWS Cloudwatch for the lambda function. And I will see the log is added as we were expecting.
Conclusion
It is extremely easy to configure SQS and connect it to lambda for handling the message. Now the question is what scenario we are going to use it.
Well for any distributed application if we want to achieve decoupling we can do that through SQS. And then next to process this message to do something we can write a lambda. So essentially a message will be published to SQS and that message can be published from one lambda and then another lambda is going to get this SQS message and process.
This whole process is available in a YouTube video here.