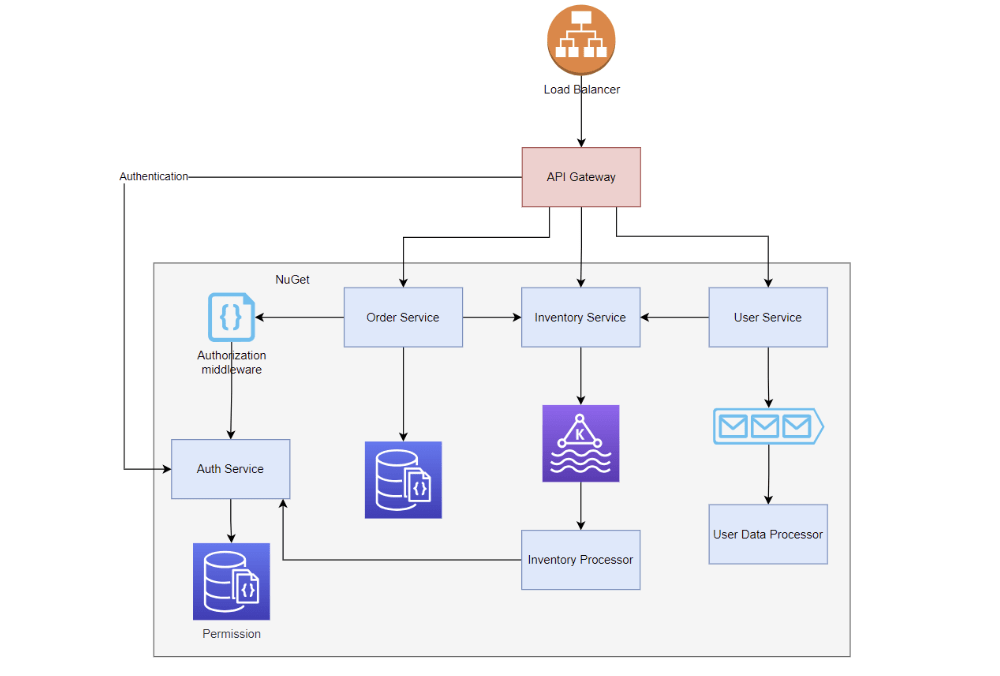
In one of my YouTube videos, I explored authentication and authorization in microservice, presenting three approaches and highlighting the one I personally prefer. If you’d like to revisit that discussion, you’ll find the video link for this topic which I covered on YouTube here.
Let’s dive into my preferred approach and expand on a common question I’ve received: How do microservices handle authentication and authorization for both HTTP-based and reactive architectures?

Introducing the API Gateway
The foundation of this approach lies in using an API Gateway. This could be:
- A built-in gateway from cloud providers.
- An external API Gateway like Apigee.
- A code-based API Gateway, such as Ocelot (I’ve also shared a video on using Ocelot; here is the link to the YouTube video).
The API Gateway acts as the entry point for all client requests—be it from web clients, mobile apps, or server-to-server communications.
Key Responsibilities of the API Gateway
- Authentication: The gateway authenticates incoming requests via an authentication service.
- User Context Propagation: After authentication, the gateway adds user context—such as tenant ID, account ID, or user ID—to the request headers before passing it to downstream microservices.
This setup ensures simplicity. Each microservice retrieves user context from the request headers and uses it for authorization if necessary.
Handling Authentication Between Microservices
When microservices need to communicate internally, authentication isn’t required since they operate within a private network. This architectural decision ensures:
- External requests: Authentication is handled by the API Gateway.
- Internal requests: Authentication is bypassed; microservices trust the API Gateway to validate requests.
The result? Streamlined communication where user context is consistently passed between services in HTTP headers.
Reactive Microservices and Authentication
For reactive microservices (those processing messages from queues like Kafka, RabbitMQ, or Azure Service Bus), the principle remains the same:
- User Context: Serialized and included in message headers or within the message body itself.
- Authorization: Reactive microservices use the user context for authorization, ensuring consistency with HTTP-based services.
This pattern creates a unified architecture where both HTTP-based and reactive microservices operate seamlessly.
Why This Approach Works
Here’s why I prefer this pattern:
- Simplified Design: Authentication is centralized at the API Gateway.
- Scalability: Adding new services is straightforward since they only need to handle user context from headers.
- Consistency: All services—HTTP-based or reactive—adhere to the same user context mechanism.
Wrapping Up
This approach balances simplicity and efficiency, reducing complexity in managing authentication and authorization across microservices.
If you found this guide helpful, please visit my YouTube channel for more content like this! And don’t forget to subscribe to my YouTube channel for more insights into microservices, authentication, and architecture best practices.
Have questions? Drop them in the comments! Let’s build better systems together.