In this blog post, I am going to discuss the Dependency Injection Service Lifetime. In the out-of-box Dependency Injection container in .NET Core or .NET 5.0, there are three main service lifetime options available.
The main focus of this blog post will be discussing the details of each of the three service lifetime that comes out of the box of the Dependency Injection container provided .NET Core/.NET 5.0. And how it behaves in different scenarios.
So I will walk through an example with different scenarios of how the lifetime actually impacts a life cycle of an object.
The three service lifetime
In .NET Core/.NET 5 out of box Dependency Injection container, we can register an object in one of the three ways:
Transient
The first way we can register a type in dependency injection container is by using a Transient lifetime.
In the case of Transient service lifetime, an object is created every time it is requested from the dependency injection container. It does not matter how many times the user of the object asks the container for the object.
Every time the caller asks for the type, the dependency injection container will create a new instance of the type and it will return it from the dependency injection container.
And the dependency injection container disposes the transient object at the end of each request.
Scoped
The second way we can register a type in the dependency injection container is using a Scoped lifetime.
Now to explain the scoped lifetime, let us consider an example of a web-based application, which is a web API. In this scenario, a scoped lifetime basically indicates
that the instance of the type that you are requesting from the dependency injection container will be created once per the request lifecycle.
Meaning once for an HTTP request. Even if you ask the dependency injection container five times to give the instance of the type, the same object created will be returned every single time across the lifetime of this HTTP request.
And once I walk through the example, it will be much more clearer how it behaves.
And the dependency injection container disposes the scoped object at the end of the HTTP request.
Singleton
The third way we can register a type in the dependency injection container is by using a Singleton lifetime service.
A Singleton instance will be created only once for the entire life cycle of the application. And every subsequent request for the object from the dependency injection container will give the same instance.
It does not matter how many time we call the dependency injection container to get the object in the entire life cycle of the application, it will return the same object.
One very important point to remember in terms of how these different instances should be created or the order of operation. In terms of the order of operation, a Singleton service can be resolved from a Singleton or a Scoped or a Transient service.
Similarly, a Scope service can be or should be resolved from a Scoped or Transient service.
The one thing we should be careful about is not to resolve a Scope service
from a Singleton service. Because it might have unwanted consequences based on how we use the Scope service.
New ASP.NET Core Application to demonstrate service lifetime
Now the next question that comes is in which scenario we use what kind of services. To understand that, let us first get into the application so that we can dig into that particular detail.
For this example, I am going to create a new ASP.NET Core web application named
Lifetime.Demo.
Firstly, to do that, I will open up Visual Studio 2019. Once Visual Studio opens up, I will select the menu File -> New -> Project. This will open the Create a new Project project popup window.
Secondly, in the Create a new Project popup window, I will select ASP.NET Core Web Application from the project template and click on the Next button.
Thirdly, on the next page, I will provide the name of the application as Lifetime.Demo and click on the Create button.
Finally, on the final page, I will select the ASP.NET Core Web API template option. And I will keep other values default (ASP.NET Core 5.0) and click on the Create button.
New Controller
Once the project is ready, I am going to create a new API read/write controller. And I am going to name the controller as CountController.
This controller is just going to provide a running count for the time being.
I am going to remove all the methods generated by the template and only keep the Get method. And for the time being there will not be any implementation.
using Microsoft.AspNetCore.Mvc;

namespace Lifetime.Demo.Controllers
{
    [Route("api/[controller]")]
    [ApiController]
    public class CountController : ControllerBase
    {
        // GET: api/<CountController>
        [HttpGet]
        public int Get()
        {
            return 0;
        }
    }
}
We will come back and provide implementation to this class.
The Counter class
Next, let us create a class and we call it Counter.
Firstly, the Counter class is going to have a private integer count. Secondly, it will have a public method Increment.
Thirdly, inside the Increment method, we are going to increment the count variable by one every time this method is called. And then we are going to return this count.
It is a very simple class, it increments a counter on Increment call, and returns when the Get method is called.
Finally, this class will implement the interface ICounter.
I have got this question a few times, like do we need to create interfaces every time? Well, the answer is yes if you intend to do unit testing.
And I encourage everyone to do unit testing for every business logic class we create. In this scenario, the interface is a must because it helps to mock the class.
namespace Lifetime.Demo
{
    public interface ICounter
    {
        int Get();
        void Increment();
    }
}

namespace Lifetime.Demo
{
    public class Counter : ICounter
    {
        private int count;

        public void Increment() => count++;

        public int Get() => count;
    }
}
Next, we are going to create two different classes. And it will be clear when we walk through the example of why we need two more classes.
The FirstCounter class
The main reason we want to have two classes is that we can use the Counter class inside of both the classes and show how it is managed by the dependency injection container for each type of service lifetime.
So the first class will be FirstCounter, it is not a very creative name, but the name which is clear enough for this example. And the constructor of this class will have a dependency on ICounter.
The FirstCounter will have a single public method IncrementAndGet. And as the name suggests, inside of this method we will first call the Increment method on the Counter object, and then we will call the Get method of the Counter object and return that value.
It is a very simple implementation. But it will be sufficient to demonstrate the feature of service lifetime of dependency injection container.
namespace Lifetime.Demo
{
    public interface IFirstCounter
    {
        int IncrementAndGet();
    }
}

namespace Lifetime.Demo
{
    public class FirstCounter : IFirstCounter
    {
        private readonly ICounter counter;

        public FirstCounter(ICounter counter)
        {
            this.counter = counter;
        }

        public int IncrementAndGet()
        {
            counter.Increment();
            return counter.Get();
        }
    }
}
The SecondCounter class
The second class I will create is SecondCounter, and again not so creative name.
I am going to give the SecondCounter the same implementation as the FirstCounter class. Hence in the constructor and I am going to inject ICounter and will have a public method IncrementAndGet.
namespace Lifetime.Demo
{
    public interface ISecondCounter
    {
        int IncrementAndGet();
    }
}

namespace Lifetime.Demo
{
    public class SecondCounter : ISecondCounter
    {
        private readonly ICounter counter;

        public SecondCounter(ICounter counter)
        {
            this.counter = counter;
        }

        public int IncrementAndGet()
        {
            counter.Increment();
            return counter.Get();
        }
    }
}
In real life example, you can relate to how it might work. As you can see we have a state in the Counter class, which we are changing through the Increment method.
And the state of the class is encapsulated and returned through the Get method.
In a nutshell, we are changing the state and we are always returning to the current state of this particular object. And this is very similar to real-life state management types.
Updating CountController
Now, I am going to update the implementation of the CountController class. Here I am going to inject the instance of IFirstCounter and ISecondCounter through the constructor.
And in the Get method, I am going to first call the IncrementAndGet on the IFirstCounter instance, and then I will call IncrementAndGet on the ISecondCounter instance and return that.
using Microsoft.AspNetCore.Mvc;

namespace Lifetime.Demo.Controllers
{
    [Route("api/[controller]")]
    [ApiController]
    public class CountController : ControllerBase
    {
        private readonly IFirstCounter firstCounter;
        private readonly ISecondCounter secondCounter;

        public CountController(IFirstCounter firstCounter, ISecondCounter secondCounter)
        {
            this.firstCounter = firstCounter;
            this.secondCounter = secondCounter;
        }

        // GET: api/<CountController>
        [HttpGet]
        public int Get()
        {
            firstCounter.IncrementAndGet();
            return secondCounter.IncrementAndGet();
        }
    }
}
The idea of the code here is that we can see what instance of ICounter is used by the IFirstCounter and ISecondCounter for the three service lifetimes.
Updating Startup
Now that the code is complete, it is time to update the Startup class to add all the classes to the Dependency Injection container.
For the first round of testing, I will configure all the classes to be of Transient service lifetime. And then we will be using the Scoped service lifetime. And finally, we will be using the Singleton service lifetime.
Hence, in the code below, I am using the AddTransient extension method on the IServiceCollection instance to add all the newly created types to the dependency injection container.
using Microsoft.AspNetCore.Builder;
using Microsoft.AspNetCore.Hosting;
using Microsoft.Extensions.Configuration;
using Microsoft.Extensions.DependencyInjection;
using Microsoft.Extensions.Hosting;
using Microsoft.OpenApi.Models;

namespace Lifetime.Demo
{
    public class Startup
    {
        public Startup(IConfiguration configuration)
        {
            Configuration = configuration;
        }

        public IConfiguration Configuration { get; }

        // This method gets called by the runtime. Use this method to add services to the container.
        public void ConfigureServices(IServiceCollection services)
        {

            services.AddControllers();
            services.AddSwaggerGen(c =>
            {
                c.SwaggerDoc("v1", new OpenApiInfo { Title = "Lifetime.Demo", Version = "v1" });
            });

            services.AddTransient<ICounter, Counter>();
            services.AddTransient<IFirstCounter, FirstCounter>();
            services.AddTransient<ISecondCounter, SecondCounter>();
        }

        // This method gets called by the runtime. Use this method to configure the HTTP request pipeline.
        public void Configure(IApplicationBuilder app, IWebHostEnvironment env)
        {
            if (env.IsDevelopment())
            {
                app.UseDeveloperExceptionPage();
                app.UseSwagger();
                app.UseSwaggerUI(c => c.SwaggerEndpoint("/swagger/v1/swagger.json", "Lifetime.Demo v1"));
            }

            app.UseHttpsRedirection();

            app.UseRouting();

            app.UseAuthorization();

            app.UseEndpoints(endpoints =>
            {
                endpoints.MapControllers();
            });
        }
    }
}
After all three classes are added to the dependency injection container, now I am going to run this application.
Running the application to demonstrate service lifetime
With the Transient service lifetime setup, if we now run the application, we are going to see that every time we call the API, it is going to create a new instance of Counter.
Meaning when the FirstCounter and the SecondCounter classes, ask for an instance of ICouner from the dependency injection container, it will create a new instance every time and return.
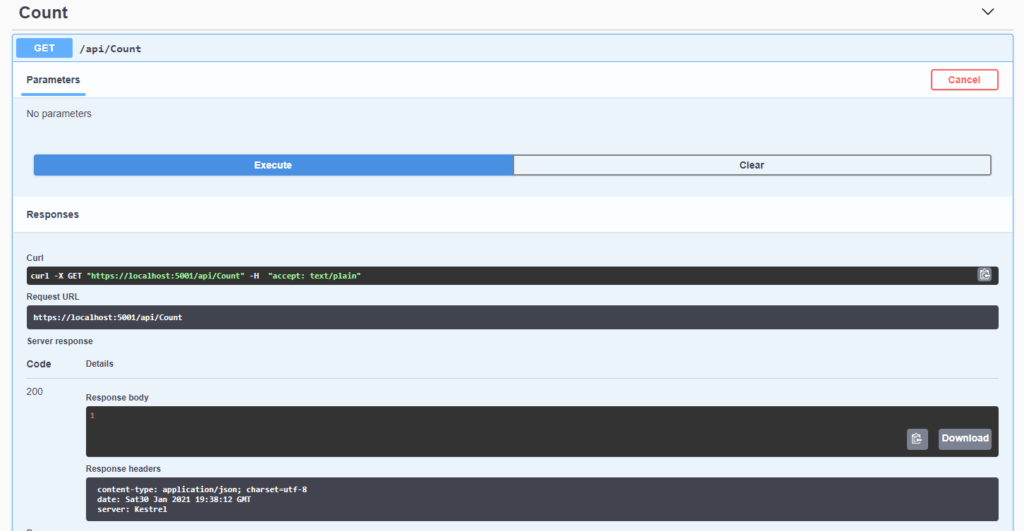
Hence the output of calling the /api/count will always result in 1.
Using Scoped service lifetime
Next, I am going to change the service lifetime of the Counter class from transient to scoped.
Hence, for that, I am going to use the AddScoped extension method on the IServiceCollection instance to register Counter.
Everything else in the code will remain the same.
public void ConfigureServices(IServiceCollection services)
{

    services.AddControllers();
    services.AddSwaggerGen(c =>
    {
        c.SwaggerDoc("v1", new OpenApiInfo { Title = "Lifetime.Demo", Version = "v1" });
    });

    services.AddScoped<ICounter, Counter>();
    services.AddTransient<IFirstCounter, FirstCounter>();
    services.AddTransient<ISecondCounter, SecondCounter>();
}
Now if I run the application, what I will see is that the ICounter instance is shared between the FirstCounter and the SecondCounter class for the HTTP request. But across two different HTTP requests, they are not the same.
Meaning for the call inside of the Get method of the CountController, when the instance of FirstCounter class and SecondCounter class asks the dependency injection container for ICounter instance; it will provide the same instance to both the classes.
Hence I will get an output of 2 every time I call the service endpoint /api/count.
Using Singleton service lifetime
Finally, I am going to change the service lifetime of the Counter class from scoped to the singleton.
Hence, for that, I am going to use the AddSingleton extension method on the IServiceCollection instance to register the Counter class.
Everything else in the code will remain the same.
public void ConfigureServices(IServiceCollection services)
{

    services.AddControllers();
    services.AddSwaggerGen(c =>
    {
        c.SwaggerDoc("v1", new OpenApiInfo { Title = "Lifetime.Demo", Version = "v1" });
    });

    services.AddSingleton<ICounter, Counter>();
    services.AddTransient<IFirstCounter, FirstCounter>();
    services.AddTransient<ISecondCounter, SecondCounter>();
}
Now if I run the application, what I will see is that the ICounter instance is shared between the FirstCounter and the SecondCounter class for every single HTTP request.
Irrespective of how many times we execute the HTTP request from the browser, the same object of Counter will be returned to the FirstCounter and SecondCounter class from the dependency injection container.
Hence, we will see that every time we make a call, the count is going to increment by 2. Meaning for the first call, the output of the call will be 2, but next time it will be 4, and then it will be 6, and so on and so forth.
Conclusion
In conclusion, now we can understand when to use Transient service lifetime, versus the Scoped service lifetime, versus the Singleton service lifetime.
Firstly, we use transient when we do not want to maintain any state inside of a class.
Secondly, if you want to maintain state across different calls inside the lifetime of a particular HTTP request, then in that case we will use scoped service lifetime.
Finally, if you want to keep the state of the object across HTTP requests for the lifetime of an application we will use a singleton service lifetime.
YouTube video for this entire blog is available here.
If you are interested, you can also read my blog post on dependency injection in .NET Core Console Application here.