Middleware in ASP.Net Core is software components that are assembled into the HTTP pipeline to handle requests and response. A middleware component can either choose to pass the request to the next component in the pipeline. Or it may choose to end the request. Middleware can perform tasks both before as well as after the next component.
The following diagram demonstrates how the HTTP request pipeline consists of a sequence of middleware (or request delegate). Each of them calls one after the other in a sequence.
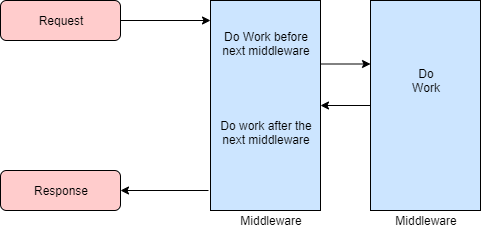
Middleware is nothing but requests delegates which builds the request pipeline. In other words, we can chain requests delegates one after another to build the HTTP pipeline. And each of these requests delegates works with HTTP requests.
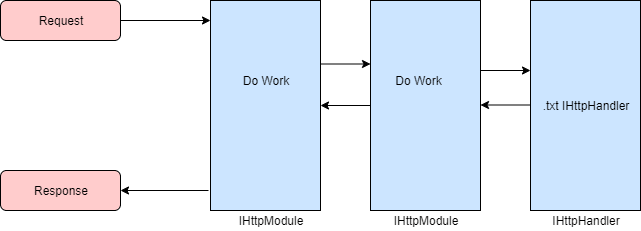
Compare with IHttpHandler and IHttpModule
In legacy .Net we have a couple of concepts that are similar to middleware in ASP.Net Core. So it is worth mentioning them.
The first one is IHttpModule, which is similar to a middleware. It sits in the pipeline of every request and can process or react to the request. It does not rely on any file extension. IHttpModule can stop the further process of the request and return response back.
The second one is the IHttpHandler. It is associated to a specific file extension. For example, if we want to do some specific processing for a .txt file extension, we will use IHttpHandler to achieve this. IHttpHandler is the last stop, the request does not go beyond an IHttpHandler. And we can have only one IHttpHandler for a file extension. Whereas we can have multiple IHttpModule on the pipeline.
Both IHttpHandler and IHttpModule configuration is in the Web.config file.
How to configure middleware in ASP.Net Core
We can configure middleware using Use, Run or the Map extension method of the IApplicationBuilder instance. We can declare the middleware in-line using an in-line anonymous delegate. Or we can define it as a reusable class.
Each middleware component is responsible for calling the next middleware in the pipeline. Or it can just return the response hence short-circuiting the call. We call a middleware a terminal middleware if it short-circuits a request pipeline.
Simplest ASP.Net Core application with Run extension method
We will create the simplest ASP.Net Core application using a middleware. Here we will use the Run extension method on the IApplicationBuilder instance to achieve this.
Firstly, I will create a new ASP.Net Core Web API application using Visual Studio 2019 (You can use IDE of your choice). I will enable the Docker container for the application.
Secondly, once the project is ready, I will update the Startup class and remove all the auto-generated code. And put the below code there.
using Microsoft.AspNetCore.Builder;
using Microsoft.AspNetCore.Hosting;
using Microsoft.AspNetCore.Http;
using Microsoft.Extensions.Hosting;

namespace Middleware.Demo
{
    public class Startup
    {
        // This method gets called by the runtime. Use this method to configure the HTTP request pipeline.
        public void Configure(IApplicationBuilder app)
        {
            app.Run(async context =>
            {
                await context.Response.WriteAsync("Hello, World!");
            });
        }
    }
}
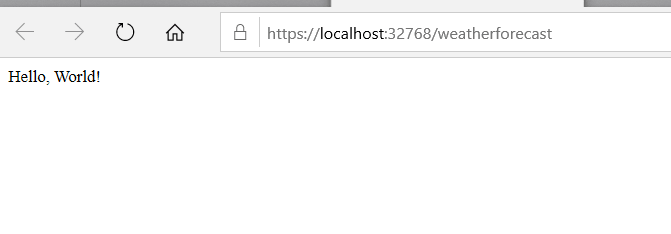
In the above example, I have a single request delegate or a middleware. And it is writing “Hello, World!” for every single HTTP request that this application receives.
Finally, I will run the application, and I can see the expected output.
Run extension method of the IApplicationBuilder instance always terminates request pipeline. Meaning, if we add another pipeline after the Run extension method, it will never be executed.
For example, if I update my Startup class to add two Run statements as below. After I compile and run the application, I will still see one response in the browser. And it will print output from the first Run statement, which is “Hello, World!”.
using Microsoft.AspNetCore.Builder;
using Microsoft.AspNetCore.Hosting;
using Microsoft.AspNetCore.Http;
using Microsoft.Extensions.Hosting;

namespace Middleware.Demo
{
    public class Startup
    {
        // This method gets called by the runtime. Use this method to configure the HTTP request pipeline.
        public void Configure(IApplicationBuilder app)
        {
            app.Run(async context =>
            {
                await context.Response.WriteAsync("Hello, World!");
            });

            app.Run(async context =>
            {
                await context.Response.WriteAsync("Another Hello, World!");
            });
        }
    }
}
Chaining requests with Use extension method
If we have to execute multiple middlewares or request delegates, we will need to use the Use extension method. To demonstrate that, I will update the code block above. I will change the first request delegate to use the Use extension method.
using Microsoft.AspNetCore.Builder;
using Microsoft.AspNetCore.Hosting;
using Microsoft.AspNetCore.Http;
using Microsoft.Extensions.Hosting;

namespace Middleware.Demo
{
    public class Startup
    {
        // This method gets called by the runtime. Use this method to configure the HTTP request pipeline.
        public void Configure(IApplicationBuilder app)
        {
            app.Use(async (context, next) =>
            {
                await context.Response.WriteAsync("Hello, World!");

                await next();
            });

            app.Run(async context =>
            {
                await context.Response.WriteAsync("Another Hello, World!");
            });
        }
    }
}
In the above code, the next parameter is the handle to the next middleware or request delegate. I will call it to execute the next middleware in the pipeline.
Now, I will run the application, and I will see both the sentences are available in the browser.

Here, I can perform tasks both before and after calling the next middleware. In the above code, I am just doing it before. Now I will change it to do it both before and after calling the next middleware.
using Microsoft.AspNetCore.Builder;
using Microsoft.AspNetCore.Hosting;
using Microsoft.AspNetCore.Http;
using Microsoft.Extensions.Hosting;

namespace Middleware.Demo
{
    public class Startup
    {
        // This method gets called by the runtime. Use this method to configure the HTTP request pipeline.
        public void Configure(IApplicationBuilder app)
        {
            app.Use(async (context, next) =>
            {
                await context.Response.WriteAsync("Hello, World!");

                await next();

                await context.Response.WriteAsync("<br>This is after another Hello, World!");
            });

            app.Run(async context =>
            {
                await context.Response.WriteAsync("<br>Another Hello, World!");
            });
        }
    }
}
I added a break statement before the two statements to make the output look clean. But this is not necessary.
Now if I run the application, I will see all the statements are printing in order as expected.

In the above example, if we want to make the first middleware as a terminate middleware, we will just stop the call to the next delegate. In a real-life scenario, we will do that only for specific file extensions where we do not want other middleware to process the request.
I will update the code to demonstrate this.
using Microsoft.AspNetCore.Builder;
using Microsoft.AspNetCore.Hosting;
using Microsoft.AspNetCore.Http;
using Microsoft.Extensions.Hosting;

namespace Middleware.Demo
{
    public class Startup
    {
        // This method gets called by the runtime. Use this method to configure the HTTP request pipeline.
        public void Configure(IApplicationBuilder app)
        {
            app.Use(async (context, next) =>
            {
                await context.Response.WriteAsync("Hello, World!");

                await context.Response.WriteAsync("<br>This is after another Hello, World!");
            });

            app.Run(async context =>
            {
                await context.Response.WriteAsync("<br>Another Hello, World!");
            });
        }
    }
}
If I run the above code, I will not see the text “Another Hello, World!” in the output as expected.

Conditional middleware with UseWhen extension method
There are scenarios when we want to execute a request based on a condition. For example, based on a query string or HTTP header value. In those cases, we will use UseWhen extension method.
Inside the UseWhen method, the code execution path behaves exactly like Use. It gets a handle to the next middleware which we will use to call the next middleware in the pipeline. Or we may decide to make this middleware a terminal middleware and not call the next middleware in the pipeline.
In the below code example, I will demonstrate a scenario where we will execute a middleware based on the query string. If the query contains a key “role”, it will execute a middleware to handle the query string.
using Microsoft.AspNetCore.Builder;
using Microsoft.AspNetCore.Hosting;
using Microsoft.AspNetCore.Http;
using Microsoft.Extensions.Hosting;
using System;

namespace Middleware.Demo
{
    public class Startup
    {
        // This method gets called by the runtime. Use this method to configure the HTTP request pipeline.
        public void Configure(IApplicationBuilder app)
        {
            app.UseWhen(context => context.Request.Query.ContainsKey("role"),
                a => a.Use(async (c, next) => {
                    var role = c.Request.Query["role"];
                    Console.WriteLine($"Role passed {role}");
                    // Do work that doesn't write to the Response.
                    await next();
                }));

            app.Use(async (context, next) =>
            {
                Console.WriteLine("Inside second middleware");
                await context.Response.WriteAsync("Hello, World!");

                await context.Response.WriteAsync("<br>This is after another Hello, World!");
            });

            app.Run(async context =>
            {
                await context.Response.WriteAsync("<br>Another Hello, World!");
            });
        }
    }
}
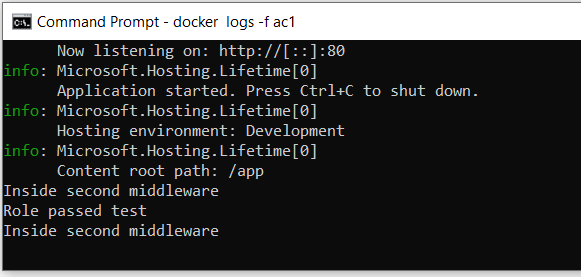
Now when we run the application with a query string of “role=test”, we will see that is getting print in the console. And immediately after that, we will see the print statement from the next middleware as expected.
Note: Unlike previous examples, we cannot use Write statement to test this.
Specific request path with Map extension method
As the name suggests, the Map extension method on the IApplicationBuilder maps a specific path to a middleware. It creates a new branch for the request. Meaning the new branch will use the Run or Use extension method to execute the request.
In the below code example, I will create a new branch of request execution for a “/newbranch” request path. When we make a request to this path, only the branch associated with this path will execute the code.
using Microsoft.AspNetCore.Builder;
using Microsoft.AspNetCore.Hosting;
using Microsoft.AspNetCore.Http;
using Microsoft.Extensions.Hosting;

namespace Middleware.Demo
{
    public class Startup
    {
        // This method gets called by the runtime. Use this method to configure the HTTP request pipeline.
        public void Configure(IApplicationBuilder app)
        {
            app.Map("/newbranch", a => a.Run(c => c.Response.WriteAsync("Running from the newbranch branch!")));

            app.Use(async (context, next) =>
            {
                await context.Response.WriteAsync("Hello, World!");

                await context.Response.WriteAsync("<br>This is after another Hello, World!");
            });

            app.Run(async context =>
            {
                await context.Response.WriteAsync("<br>Another Hello, World!");
            });
        }
    }
}
If I run the above code and request path “https://localhost:32768/newbranch”, I will see only the text “Running from the newbranch branch!” as expected. Whereas for any other path, I will see the result as in previous output.
Below table demonstrates the scenarios:
| Request | Output |
|---|---|
| https://localhost:32768/weatherforecast | Hello, World! This is after another Hello, World! |
| https://localhost:32768/ | Hello, World! This is after another Hello, World! |
| https://localhost:32768/newbranch | Running from the newbranch branch! |
Below is the output from the application when we access the “/newbranch” URL.

Nesting with Map extension method
The Map extension method supports nesting. If we want to branch out different segments of a request we can do so with nested mapping.
For example, if we want to execute /newbranch/branch1 in a separate branch compared to /newbranch/branch2, we can do so using nested Map.
The code below demonstrates the nest Map feature.
using Microsoft.AspNetCore.Builder;
using Microsoft.AspNetCore.Hosting;
using Microsoft.AspNetCore.Http;
using Microsoft.Extensions.Hosting;

namespace Middleware.Demo
{
    public class Startup
    {
        // This method gets called by the runtime. Use this method to configure the HTTP request pipeline.
        public void Configure(IApplicationBuilder app)
        {
            app.Map("/newbranch", a => {
                a.Map("/branch1", brancha => brancha
                    .Run(c => c.Response.WriteAsync("Running from the newbranch/branch1 branch!")));
                a.Map("/branch2", brancha => brancha
                    .Run(c => c.Response.WriteAsync("Running from the newbranch/branch2 branch!")));

                a.Run(c => c.Response.WriteAsync("Running from the newbranch branch!"));
        });

            app.Use(async (context, next) =>
            {
                await context.Response.WriteAsync("Hello, World!");

                await context.Response.WriteAsync("<br>This is after another Hello, World!");
            });

            app.Run(async context =>
            {
                await context.Response.WriteAsync("<br>Another Hello, World!");
            });
        }
    }
}
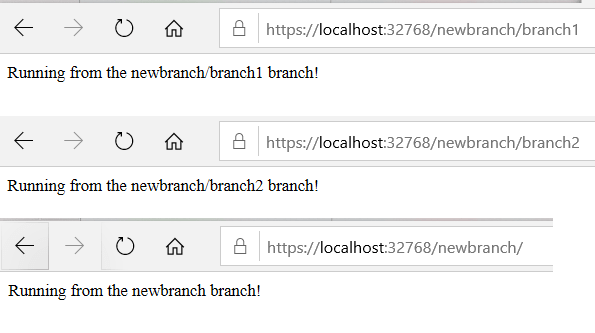
When we run the above code and browse to “https://localhost:32768/newbranch/branch1”, we will see the text “Running from the newbranch/branch1 branch!” in the output. Whereas if we browse to “https://localhost:32768/newbranch/branch2”, we will see the output “Running from the newbranch/branch2 branch!”. Finally, if we browse to “https://localhost:32768/newbranch/”, we will see the output “Running from the newbranch branch!” as before.
The Map extension method can also match multiple segments of the URL. Meaning if we do not have branch1 and branch2 in the previous example. And just have one branch with /newbranch/branch1, we can use Map to branch out this URL.
The below code demonstrates this example. To preserve the existing code, instead of using newbranch, I will use a new segment named newsegment and segment1, URL /newsegment/segment1.
using Microsoft.AspNetCore.Builder;
using Microsoft.AspNetCore.Hosting;
using Microsoft.AspNetCore.Http;
using Microsoft.Extensions.Hosting;

namespace Middleware.Demo
{
    public class Startup
    {
        // This method gets called by the runtime. Use this method to configure the HTTP request pipeline.
        public void Configure(IApplicationBuilder app)
        {
            app.Map("/newsegment/segment1", a =>
                a.Run(c => c.Response.WriteAsync("Running from the /newsegment/segment1 branch!")));

            app.Map("/newbranch", a => {
                a.Map("/branch1", brancha => brancha
                    .Run(c => c.Response.WriteAsync("Running from the newbranch/branch1 branch!")));
                a.Map("/branch2", brancha => brancha
                    .Run(c => c.Response.WriteAsync("Running from the newbranch/branch2 branch!")));

                a.Run(c => c.Response.WriteAsync("Running from the newbranch branch!"));
            });

            app.Use(async (context, next) =>
            {
                await context.Response.WriteAsync("Hello, World!");

                await context.Response.WriteAsync("<br>This is after another Hello, World!");
            });

            app.Run(async context =>
            {
                await context.Response.WriteAsync("<br>Another Hello, World!");
            });
        }
    }
}
When I run the application and browse the URL “https://localhost:32768/newsegment/segment1”, I will see the text “Running from the /newsegment/segment1 branch!” in output as expected.

In the previous example, if we just browse to “https://localhost:32768/newsegment” we will see output from the default middleware in our code. Which will print the following message in the browser output “Hello, World! This is after another Hello, World!”.
Conditional branching with MapWhen extension method
There are scenarios when we want to branch out based on a condition. For example, based on a query string or HTTP header value. In those cases, we will use MapWhen extension method.
Let us consider a scenario, if the query string of a request contains “role”, we want to branch it out differently, compared to other requests. The below code demonstrates how we can achieve this.
using Microsoft.AspNetCore.Builder;
using Microsoft.AspNetCore.Hosting;
using Microsoft.AspNetCore.Http;
using Microsoft.Extensions.Hosting;

namespace Middleware.Demo
{
    public class Startup
    {
        // This method gets called by the runtime. Use this method to configure the HTTP request pipeline.
        public void Configure(IApplicationBuilder app)
        {
            app.MapWhen(c => c.Request.Query.ContainsKey("role"), a =>
                a.Run(async context =>
                {
                    var role = context.Request.Query["role"];
                    await context.Response.WriteAsync($"Role received {role}");
                }));

            app.Map("/newsegment/segment1", a =>
                a.Run(c => c.Response.WriteAsync("Running from the /newsegment/segment1 branch!")));

            app.Map("/newbranch", a => {
                a.Map("/branch1", brancha => brancha
                    .Run(c => c.Response.WriteAsync("Running from the newbranch/branch1 branch!")));
                a.Map("/branch2", brancha => brancha
                    .Run(c => c.Response.WriteAsync("Running from the newbranch/branch2 branch!")));

                a.Run(c => c.Response.WriteAsync("Running from the newbranch branch!"));
            });

            app.Use(async (context, next) =>
            {
                await context.Response.WriteAsync("Hello, World!");

                await context.Response.WriteAsync("<br>This is after another Hello, World!");
            });

            app.Run(async context =>
            {
                await context.Response.WriteAsync("<br>Another Hello, World!");
            });
        }
    }
}
When we execute the above code, no not matter which URL we navigate to. If the query string contains key “role” then the new middleware will execute.

Order of middlewares
The order of middleware is simple, it is as we add them in the Startup class’s Configure method. Ordering of the middleware matters for some of the middleware components. For example, authentication and authorization middleware must go in the order of authentication first and then authorization.
Middlewares available out of box
There are many middlewares provided out of the box. For example Authentication, Authorization, CORS, etc. The complete is list is available in the reference section at the end of this post.
All the out of the box middlewares comes with their own extension methods. Let us try to create an extension method similar to the out of box middlewares.
For example, if we need a middleware which will process our custom logic, we can create a new class with name MiddlewareExtension with an extension method UseCustomExtension. And use it inside of the Startup class.
using Microsoft.AspNetCore.Builder;
using Microsoft.AspNetCore.Http;

namespace Middleware.Demo
{
    public static class MiddlewareExtension
    {
        public static void UseCustomExtension(this IApplicationBuilder app)
        {
            app.Use(async (context, next) =>
            {
                await context.Response.WriteAsync("Custom logic before next middleware");
                await next();
                await context.Response.WriteAsync("<br>Custom logic after next middleware");
            });
        }
    }
}
Below code contains the change to the Startup.
using Microsoft.AspNetCore.Builder;
using Microsoft.AspNetCore.Hosting;
using Microsoft.AspNetCore.Http;
using Microsoft.Extensions.Hosting;

namespace Middleware.Demo
{
    public class Startup
    {
        // This method gets called by the runtime. Use this method to configure the HTTP request pipeline.
        public void Configure(IApplicationBuilder app)
        {
            app.UseCustomExtension();

            app.Run(async context =>
            {
                await context.Response.WriteAsync("<br>Another Hello, World!");
            });
        }
    }
}
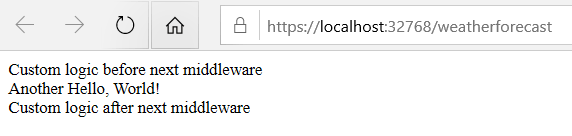
When we run this application, we will get the output from the newly created middleware as expected.
Custom middleware in ASP.Net Core
To add a custom middleware, we will use the UseMiddleware extension method of the IApplicationBuilder instance.
To create a new custom middleware, all we have to do is to create a class with a constructor which needs RequestDelegate as a parameter. And a public method with return type Task and name as Invoke with parameter HttpContext.
using Microsoft.AspNetCore.Http;
using System.Threading.Tasks;

namespace Middleware.Demo
{
    public class CustomMiddleware
    {
        private readonly RequestDelegate next;

        public CustomMiddleware(RequestDelegate next)
        {
            this.next = next;
        }

        public async Task Invoke(HttpContext httpContext)
        {
            await httpContext.Response.WriteAsync("Inside of new custom middleware");
            await next(httpContext);
        }
    }
}
Once I create this new CustomMiddleware class, I will update the UseCustomExtension method I created before to use this custom middleware.
using Microsoft.AspNetCore.Builder;

namespace Middleware.Demo
{
    public static class MiddlewareExtension
    {
        public static void UseCustomExtension(this IApplicationBuilder app)
        {
            app.UseMiddleware<CustomMiddleware>();
        }
    }
}
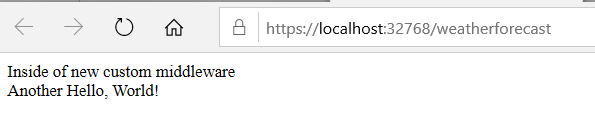
Finally, I will run this application and will see the print from the new custom middleware in the output.
Conclusion
In conclusion, middleware in ASP.Net Core is an extremely powerful concept. In my previous blogs about Authorization and Authentication, I have used built-in middleware.
Middleware in ASP.Net Core makes horizontal responsibility implementation very clean. Making separation of concern for orthogonal responsibilities very easy to implement.
Reference:
https://docs.microsoft.com/en-us/aspnet/core/fundamentals/middleware/?view=aspnetcore-3.1