A lot of times, we need to create applications that need some sort of time-based scheduling. Hangfire helps us right there. Hangfire provides a very easy and fluent way to create and manage scheduled jobs.
The disadvantage of creating a solution for scheduling job from scratch are the following:
- Firstly, it is usually cumbersome and time-consuming to build something like this.
- Secondly given it is not the core feature of the application, there is very little return on investment.
- Finally, it is usually error-prone to build something like that from scratch.
Creating schedule jobs to run at a particular interval is always tedious. And also error-prone. It encapsulates all these and provides very easy to use API for configuring jobs.
In this blog, I will walk through creating an ASP.Net application, which will use it to manage recurring jobs.
Basic Hangfire concepts
It has three main components for managing jobs. The first one is Storage, the second one is the Client and the third one is the Server.
Storage
It uses storage for keeping all the job information for processing. Every single detail about the job is saved in the storage in a serialized format. The design for the storage system is extensible. And we can implement an extension for any type of storage medium.
The storage is added into the Hangfire through configuration during startup. And it is a mandatory component that is needed for it to work.
In this example for this blog, I will first use In-Memory storage provider, and then eventually use SQL Server storage provider.
Client
In Hangfire, the client is nothing but the API the consumers use to create background jobs. The client is responsible for storing the jobs into the storage provider configured.
The background jobs should always be performed outside of the main execution context. And it manages this internally without needing for additional configuration.
Server
The server is the component responsible for executing the background jobs. It gets information about the scheduled jobs from the storage and executes them based on the configuration.
The server listens to the storage through multiple threads for new jobs. And once they are available, perform them by deserializing the job information saved in the storage.
The server is represented by the class BackgroundJobServer. And the background job server can be running in any process.
Creating an ASP.Net Core Application
First of all, I will create a new ASP.Net Core web application. For that I will follow the following steps:
- Open Visual Studio 2019
- In the menu, select File -> New Project
- Next, in the pop-up model, select ASP.NET Core Web Application and click Next
- After that, on the next page of the pop-up, I will provide the name of the project in the Project Name field as Hangfire.Demo and click on the Create
- Finally, on the next page, I will select the option Empty template, and I will keep other values default (ASP.Net Core 3.1) and click Create
Once the project is ready, I will open the NuGet package manager UI and add the necessary NuGet packages. The three main Nuget packages needed for hangfire are:
- Hangfire.Core – The core package that supports the core logic of Hangfire
- Hangfire.AspNetCore – Support for ASP.Net Core Middleware and Middleware for the dashboard user interface
- Hangfire.MemoryStorage – This package will provide in-memory storage for saving the background jobs
Configuring Hangfire
Once all the NuGet packages are installed, it is time to configure the server. To do that, I will open the Startup.cs file and update the ConfigureServices method of the Startup class.
I will first call the AddHangfire extension method on the IServiceCollection instance to add the Hangfire to the Dependency Injection container.
services.AddHangfire(config =>
    config.SetDataCompatibilityLevel(CompatibilityLevel.Version_170)
        .UseSimpleAssemblyNameTypeSerializer()
        .UseDefaultTypeSerializer()
        .UseMemoryStorage());
In the above code, the AddHangfire method takes an Action delegate, which passes IGlobalConfiguration of the Hangfire ecosystem to configure the Hangfire.
And here first I will call SetDataCompatibilityLevel method on the IGlobalConfiguration instance passed to set the compatibility to Version_170.
Next, I will call the UseSimpleAssemblyNameTypeSerializer and UseDefaultTypeSerializer one after the other, to set serialization configuration.
Finally, I will call UseMemoryStorage on the IGlobalConfiguration instance to set up an in-memory storage provider.
Next, I will call the extension method AddHangfireServer on the IServiceCollection instance to add the Hangfire server to the dependency injection container. Which we will use later to configure and run jobs.
services.AddHangfireServer();
Update Configure method
Once the basic setup for the dependency injection container is done, now I will add the middleware needed to add the Hangfire dashboard UI. For that, I will call the extension method UseHangfireDashboard to the IApplicationBuilder instance.
app.UseHangfireDashboard();
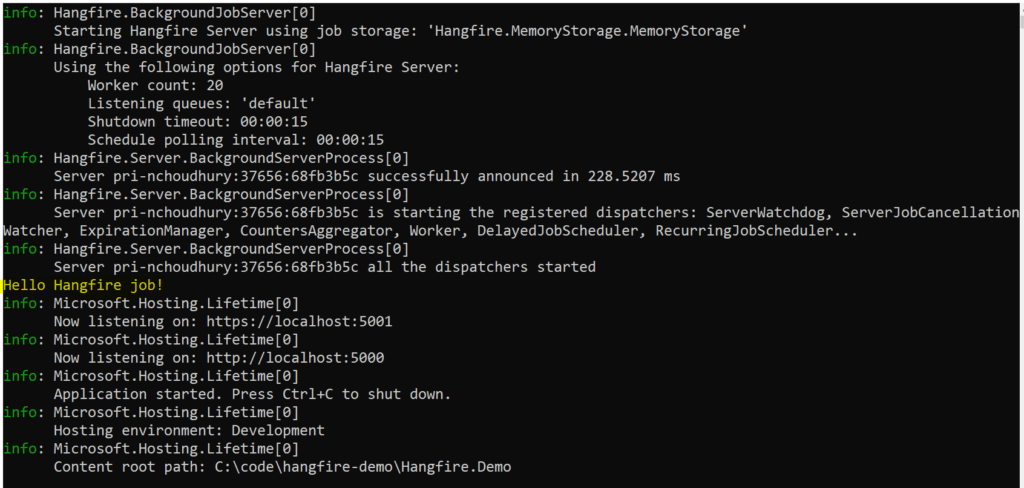
Finally, just to test a basic Hangfire job, I will use the Enqueue method of the IBackgroundJobClient instance to enqueue a simple Console.WriteLine statement.
To achieve this I will update the Configure method to accept a new parameter IBackgroundJobClient. This will be passed by the dependency injection container, since we added the Hangfire server earlier by calling the AddHangfireServer method.
backgroundJobClient.Enqueue(() => Console.WriteLine("Hello Hangfire job!"));
Complete code change in the Startup is below.
using System;
using Hangfire.MemoryStorage;
using Microsoft.AspNetCore.Builder;
using Microsoft.AspNetCore.Hosting;
using Microsoft.AspNetCore.Http;
using Microsoft.Extensions.DependencyInjection;
using Microsoft.Extensions.Hosting;

namespace Hangfire.Demo
{
    public class Startup
    {
        // This method gets called by the runtime. Use this method to add services to the container.
        // For more information on how to configure your application, visit https://go.microsoft.com/fwlink/?LinkID=398940
        public void ConfigureServices(IServiceCollection services)
        {
            services.AddHangfire(config =>
                config.SetDataCompatibilityLevel(CompatibilityLevel.Version_170)
                .UseSimpleAssemblyNameTypeSerializer()
                .UseDefaultTypeSerializer()
                .UseMemoryStorage());

            services.AddHangfireServer();
        }

        // This method gets called by the runtime. Use this method to configure the HTTP request pipeline.
        public void Configure(
            IApplicationBuilder app,
            IWebHostEnvironment env,
            IBackgroundJobClient backgroundJobClient)
        {
            if (env.IsDevelopment())
            {
                app.UseDeveloperExceptionPage();
            }

            app.UseRouting();

            app.UseEndpoints(endpoints =>
            {
                endpoints.MapGet("/", async context =>
                {
                    await context.Response.WriteAsync("Hello World!");
                });
            });

            app.UseHangfireDashboard();
            backgroundJobClient.Enqueue(() => Console.WriteLine("Hello Hangfire job!"));
        }
    }
}
Running the application
Now, the above job will just print Hello Hangfire job! to the console output.
I will run the application to see the output as well as the Hangfire dashboard UI. To access the dashboard UI, we will navigate to the resource /hangfire.
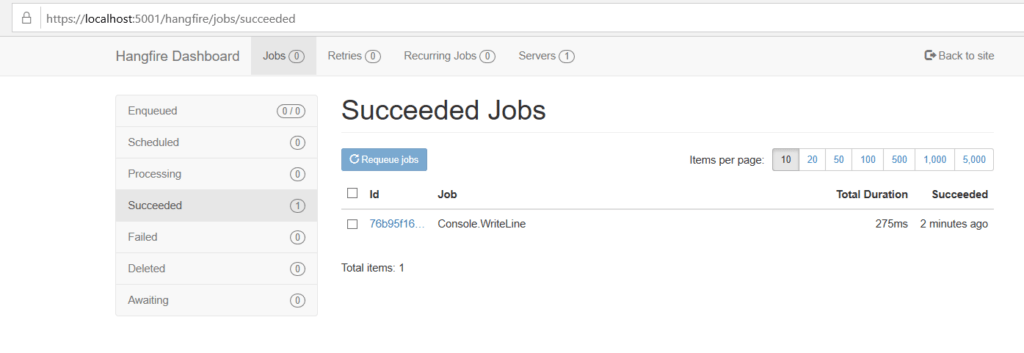
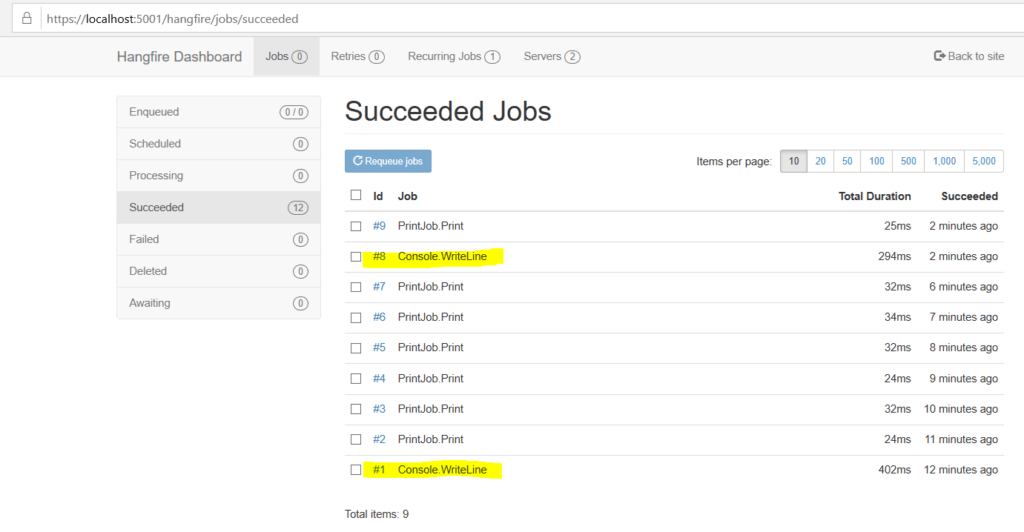
Above in the dashboard UI, we can see the Console.WriteLine job as completed.
As you can see here, the job itself is saved as Console.WriteLine. It is because Hangfire serializes the method, type and other information along with the state in the storage. And during execution, the server deserializes this information for execution.
Creating a recurring job
Creating a background job as we did above is easy with Hangfire, but it is as easy using an instance of Task class as well. So why go with something like Hangfire and install all these packages into the project?
Well, the main advantage of Hangfire comes in when we use it for creating scheduling jobs. It uses CRON expressions for scheduling.
Let us say we need to create a job that is responsible for printing some text into the console every minute. To do that, let us first create a class that will do just that.
namespace Hangfire.Demo
{
    public interface IPrintJob
    {
        void Print();
    }
}

using System;

namespace Hangfire.Demo
{
    public class PrintJob : IPrintJob
    {
        public void Print()
        {
            Console.WriteLine($"Hanfire recurring job!");
        }
    }
}
Configure Startup class
Once the PrintJob class is created, it is time to configure the Startup class. In the Startup class, the objective is to configure a recurring job to call the Print method every minute.
Firstly, I will add the PrintJob to the dependency injection container in the ConfigureServices method.
services.AddSingleton<IPrintJob, PrintJob>();
Secondly, I will update the Configure method to take two new parameters. The first one is the IRecurringJobManager necessary for creating a recurring job. And the second one is the IServiceProvider to get the IPrintJob instance from the dependency injection container.
Thirdly, I will call the AddOrUpdate on the IRecurringJobManager instance to set up a recurring job.
recurringJobManager.AddOrUpdate(
                "Run every minute",
                () => serviceProvider.GetService<IPrintJob>().Print(),
                "* * * * *"
                );
In the above code, the CRON expression “* * * * *” is an expression to run the job every minute.
The complete change in the Startup code is below:
using System;
using Hangfire.MemoryStorage;
using Microsoft.AspNetCore.Builder;
using Microsoft.AspNetCore.Hosting;
using Microsoft.AspNetCore.Http;
using Microsoft.Extensions.DependencyInjection;
using Microsoft.Extensions.Hosting;

namespace Hangfire.Demo
{
    public class Startup
    {
        // This method gets called by the runtime. Use this method to add services to the container.
        // For more information on how to configure your application, visit https://go.microsoft.com/fwlink/?LinkID=398940
        public void ConfigureServices(IServiceCollection services)
        {
            services.AddHangfire(config =>
                config.SetDataCompatibilityLevel(CompatibilityLevel.Version_170)
                .UseSimpleAssemblyNameTypeSerializer()
                .UseDefaultTypeSerializer()
                .UseMemoryStorage());

            services.AddHangfireServer();

            services.AddSingleton<IPrintJob, PrintJob>();
        }

        // This method gets called by the runtime. Use this method to configure the HTTP request pipeline.
        public void Configure(
            IApplicationBuilder app,
            IWebHostEnvironment env,
            IBackgroundJobClient backgroundJobClient,
            IRecurringJobManager recurringJobManager,
            IServiceProvider serviceProvider)
        {
            if (env.IsDevelopment())
            {
                app.UseDeveloperExceptionPage();
            }

            app.UseRouting();

            app.UseEndpoints(endpoints =>
            {
                endpoints.MapGet("/", async context =>
                {
                    await context.Response.WriteAsync("Hello World!");
                });
            });

            app.UseHangfireDashboard();
            backgroundJobClient.Enqueue(() => Console.WriteLine("Hello Hanfire job!"));
            recurringJobManager.AddOrUpdate(
                "Run every minute",
                () => serviceProvider.GetService<IPrintJob>().Print(),
                "* * * * *"
                );
        }
    }
}
Now let us run the application and see the result in the console as well as the dashboard.
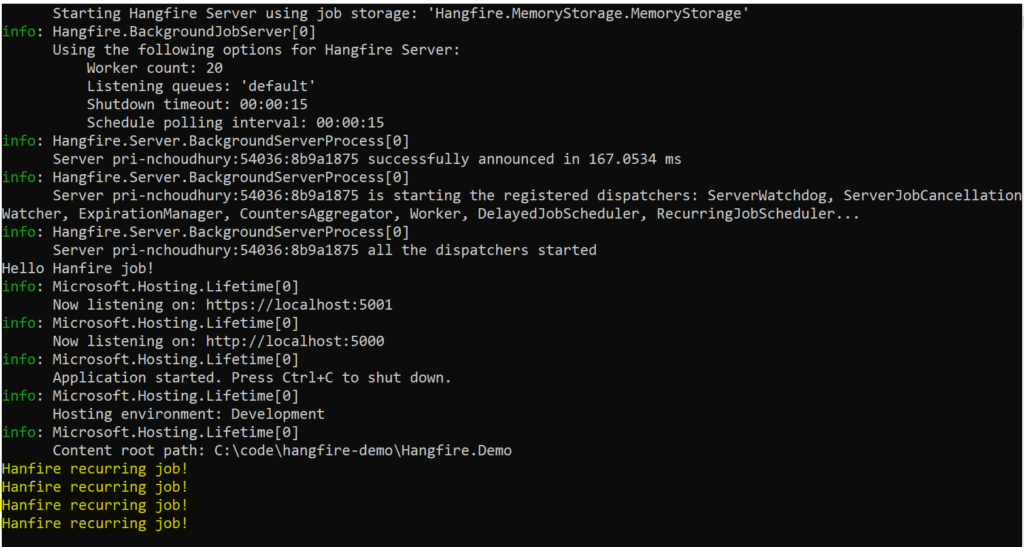
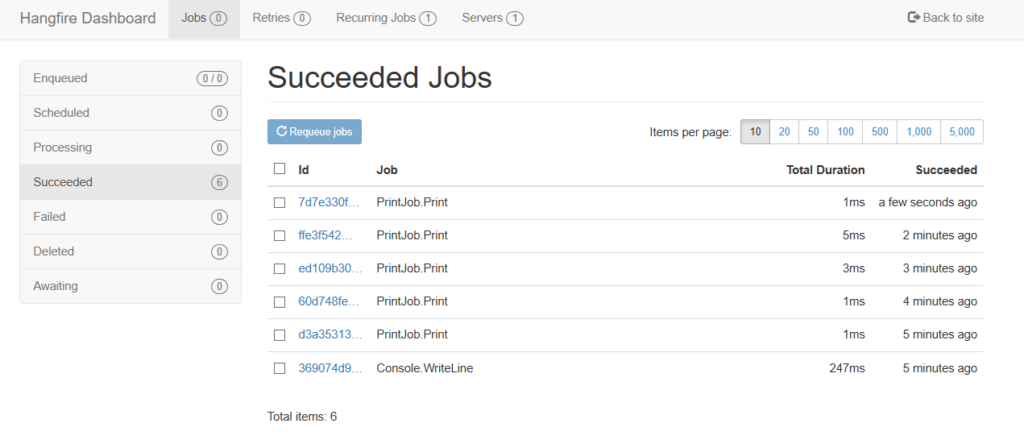
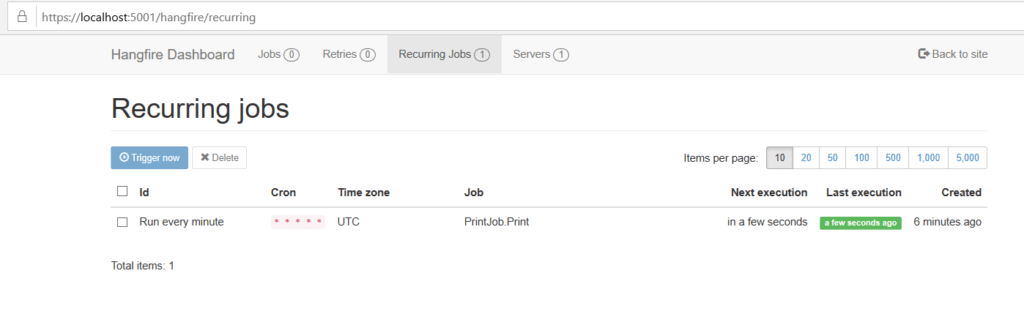
As we can see, in the Recurring Jobs tab of the dashboard, we can see the recurring jobs scheduled.
SQL Server for Job Storage
Now let us explore, how we can use SQL Server for job storage. For using SQL Server for job storage, first, we will have to create the database.
Firstly, I will open the SQL Server Management Studio and connect to the local database SQL Express server.
Secondly, I will execute the following command in the SQL Server to create a new database named HangfireTest:
CREATE DATABASE [HangfireTest]
GO
Once the database is created, now it is time to update the existing project to use this database as the job storage.
Adding database configuration
Firstly, I will add a new configuration to appsettings.json file with the name Hangfire.
{
  "Logging": {
    "LogLevel": {
      "Default": "Information",
      "Microsoft": "Warning",
      "Microsoft.Hosting.Lifetime": "Information"
    }
  },
  "AllowedHosts": "*",
  "Hangfire": "Server=.\\sqlexpress;Database=HangfireTest;Integrated Security=SSPI;"
}
Secondly, I will add a new NuGet package Hangfire.SqlServer. For doing that I will open the NuGet package manager and search for Hangfire.SqlServer and install it.
Once that is done, it is time to configure the SQL Server storage in the Startup class. For that, I will change the AddHangfire method to replace memory storage with SQL Server storage.
Also, since the connection is in configuration, I will update the Startup class to add a constructor. And the constructor will expect the IConfiguration to be available through dependency injection.
public Startup(IConfiguration configuration)
{
    Configuration = configuration;
}

public IConfiguration Configuration { get; }
To replace memory storage with SQL Server storage, I will replace UseMemoryStorage extension method with UseSqlServerStorage extension methid. The UseSqlServerStorage takes the connection string as a parameter. And SqlServerStorageOptions as second parameter in another overload.
For this example, I will just pass the connection string for the time being. I will not be passing the SqlServerStorageOptions for the time being.
using System;
using Hangfire.MemoryStorage;
using Microsoft.AspNetCore.Builder;
using Microsoft.AspNetCore.Hosting;
using Microsoft.AspNetCore.Http;
using Microsoft.Extensions.Configuration;
using Microsoft.Extensions.DependencyInjection;
using Microsoft.Extensions.Hosting;

namespace Hangfire.Demo
{
    public class Startup
    {
        public Startup(IConfiguration configuration)
        {
            Configuration = configuration;
        }

        public IConfiguration Configuration { get; }

        // This method gets called by the runtime. Use this method to add services to the container.
        // For more information on how to configure your application, visit https://go.microsoft.com/fwlink/?LinkID=398940
        public void ConfigureServices(IServiceCollection services)
        {
            services.AddHangfire(config =>
                config.SetDataCompatibilityLevel(CompatibilityLevel.Version_170)
                .UseSimpleAssemblyNameTypeSerializer()
                .UseDefaultTypeSerializer()
                .UseSqlServerStorage(Configuration["Hangfire"]));

            services.AddHangfireServer();

            services.AddSingleton<IPrintJob, PrintJob>();
        }

        // This method gets called by the runtime. Use this method to configure the HTTP request pipeline.
        public void Configure(
            IApplicationBuilder app,
            IWebHostEnvironment env,
            IBackgroundJobClient backgroundJobClient,
            IRecurringJobManager recurringJobManager,
            IServiceProvider serviceProvider)
        {
            if (env.IsDevelopment())
            {
                app.UseDeveloperExceptionPage();
            }

            app.UseRouting();

            app.UseEndpoints(endpoints =>
            {
                endpoints.MapGet("/", async context =>
                {
                    await context.Response.WriteAsync("Hello World!");
                });
            });

            app.UseHangfireDashboard();
            backgroundJobClient.Enqueue(() => Console.WriteLine("Hello Hanfire job!"));
            recurringJobManager.AddOrUpdate(
                "Run every minute",
                () => serviceProvider.GetService<IPrintJob>().Print(),
                "* * * * *"
                );
        }
    }
}
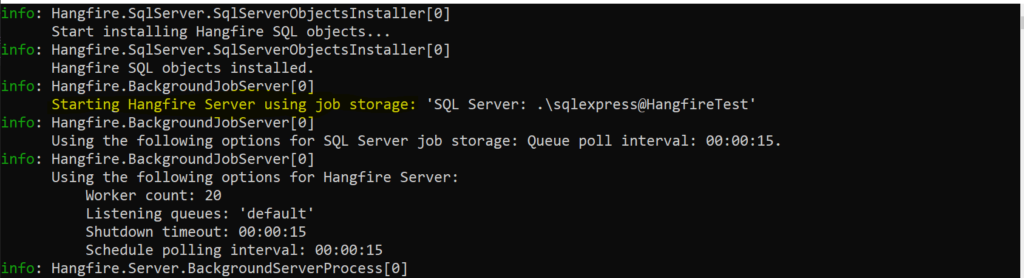
Now if I run the application, I will see the same response as I saw before when I was using memory storage. The only difference is now it will be starting a SQL Server memory storage, and we can see it in the Console capture below.
The next very important feature we get out of using SQL Server is that the states are available across processes and process restarts. Meaning now, if I restart the application and open the dashboard, I can see even the job executed earlier are available in the dashboard.
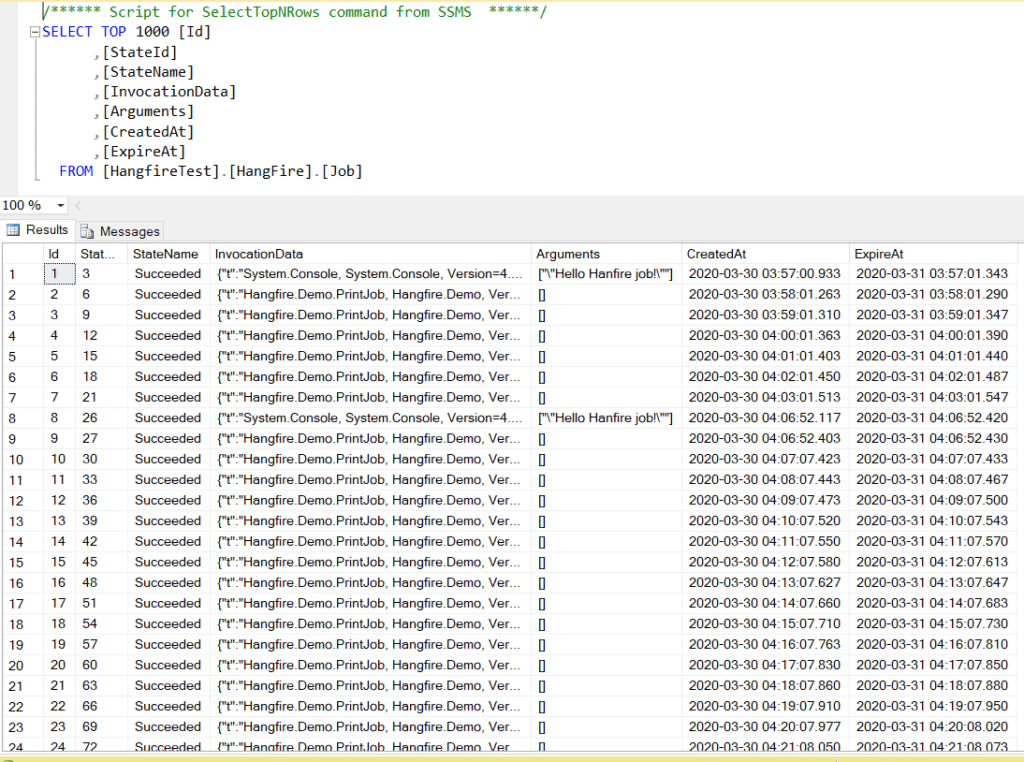
DB Structure
Once we run the application, Hangfire will create all the necessary tables. There are only two tables that are more meaningful for us, one is the Hash table and the second one is the Job table.
The Hash table is where the serialized job is stored by the Hangfire.
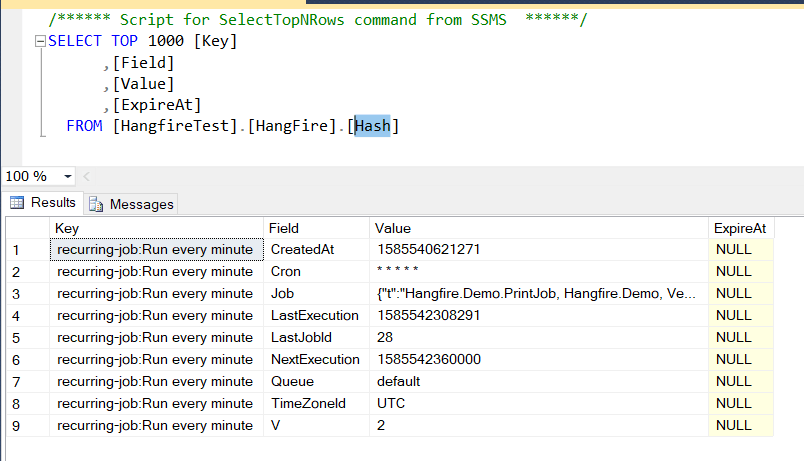
The Job table is the one that holds all the job history.
Deleting and Triggering Jobs through Hangfire Dashboard
Using the dashboard we can trigger a job as well as delete a job.
So if we have to delete the recurring job, we can just go into the dashboard, select the job and click Delete.
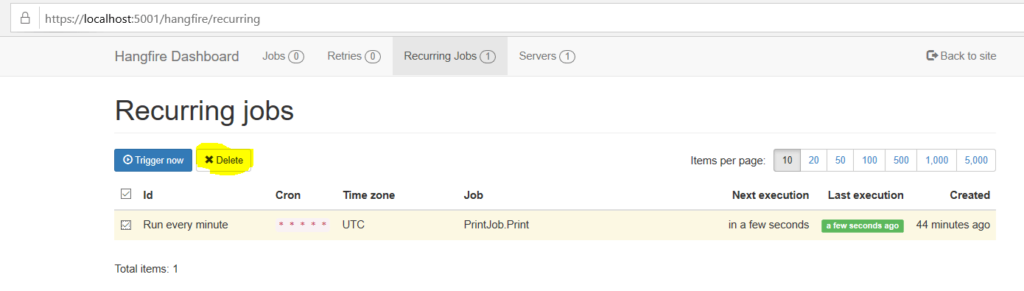
Now, if we go to the database and select the Hash table, we will not see any rows there.
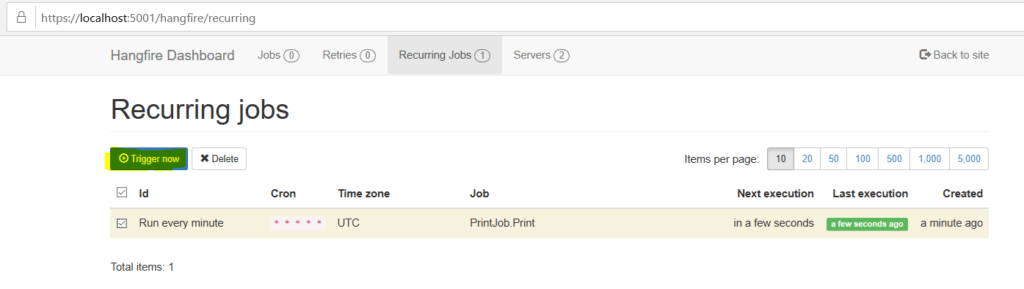
If we have to trigger the Job, we can just select the job and click Trigger now. That will trigger and run the job immediately outside of the cycle.
Conclusion
As we can see from the experiment, using Hangfire for recurring jobs is really simple and easy. And on top of that using the dashboard makes it really powerful.
It works very well with the ASP.Net Core ecosystem. And it can be configured with few lines of code to do any kind of recurring jobs. I just love this framework for any recurring jobs.
YouTube Video URL: https://youtu.be/sQyY0xvJ4-o